2/28/2007

Revoltech Megatron

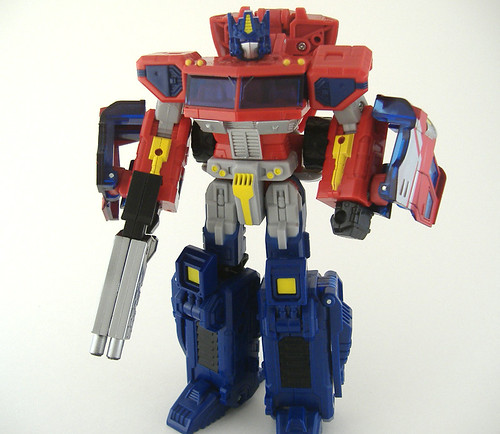
HobbyLink Japan has the Revoltech Megatron figure available for pre-order. Order by March 16 and you get 5% off the price of 1900Y. Pictures of the figure are up, as well. It will be in my collection.

Revoltech, in case you don't know, is a toy line produced by Japanese toy manufacturer Kaiyodo, well known for their action figures. The Revoltech line, mostly robots, features ratcheting and other types of joints that allow the figures to be very poseable. So far, the line features mecha and characters from Evangelion, Transformers, Patlabor, Devil May Cry and Getter Robo, among others.

Look for a review of the Revoltech Ingram 1 from Patlabor and Evangelion Unit 01 in the coming weeks (soon as I get batteries for my digital camera.)

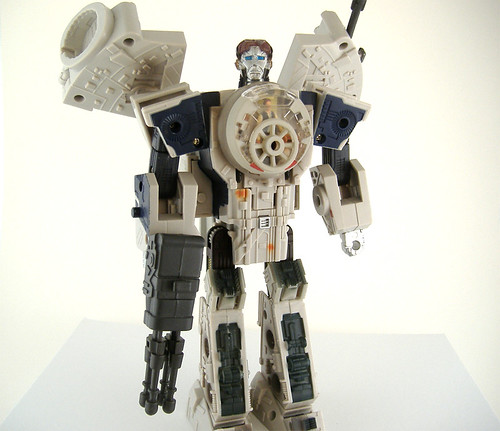
Star Wars/Transformers Millennium Falcon w/ Han Solo and Chewbacca - Review

Purchased at: Unknown
Price: Unknown

I got this for my birthday, so I don’t know where it was purchased. I know that I’ve seen this toy on sale at both Wal-Mart and Target recently, so you should be able to get it at a decent price.

To be honest, this line of figures has never really appealed to me. Counting this one, I’ve got three of the figures and I’ve gotten all of them as gifts. I also have the TIE Advanced/Darth Vader and the Jedi Starfighter/Obi Wan Kenobi figures. I don’t think I would have ever gone and bought these for myself. That being said, I AM a collector of all things Millennium Falcon (my wife would ask, “What AREN’T you a collector of?”), with several different versions of the ship. After getting this one out of the box, it will make a welcome addition to the collection.

Robot Mode
The Falcon is comprised to two figures, Han and Chewie. What’s nice here is that, when transformed into vehicle mode, none of the characteristics from robot mode show through. However, in robot mode, each figure doesn’t just look like a chunk of the Falcon with a head stuck on top. Each bot features some characteristics the actual character they represent exhibited.

SWTF Falcon 2

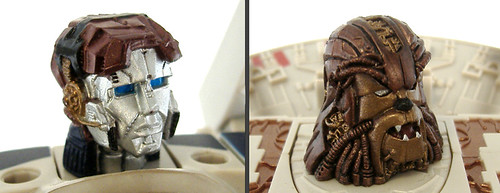
The Han figure (we’ll call them mechs) tries to convey the image of Han from Episode V. The lower legs and feet have some dark gray highlights reminiscent of his black boots. Han's overall scheme is designed to evoke the uniform he wears through much of the first part of The Empire Strikes Back. The thighs are painted brown, to represent his pants, and even feature yellow “Corellian bloodstripes” on the sides of the legs. The shoulders and lower arms have some dark blue, as well, that hearken back to his dark blue jacket. The head isn’t a BAD representation, per se, it kind of captures Han’s furrowed brow and poofy 70’s haircut. When you consider that these are only supposed to be mechs and not the actual, living character, it works. There's even a neat little headset molded on the the figure's head. The figure itself, however, just sort of fails. Because of the transformation, part of the Falcon’s hull forms a kind of pair of wings, and the “torso” is very big and bulky. That, coupled with the figure’s tiny feet, makes the thing very unstable and top-heavy. The arms are another shortcoming. Because of the way the toy is designed, the shoulder armor doesn’t allow the arms to be positioned horizontally. You can’t take Han’s arm and raise it up so that it looks like he’s firing a blaster, you can only pose him to make it look likes he’s firing from the hip or just holding his blaster kind of nonchalantly. The upper quad cannon is Han’s blaster. There is also a hole on the “wings” where you can insert the radar dish, which must be removed when transforming into robot mode. Compared to the other figures in this line, the Han figure is just kind of…average, and not really fun.

SWTF Falcon 3

The Chewie mech, however, is a completely different story. There are brown “fur” highlights from his head to his feet. These little highlights are completely hidden in vehicle mode. The feet even have little clawed toes. Do wookies even have clawed toes (or any toes, for that matter)? I don’t know, but why the heck wouldn’t they? The legs start out narrow near the hips and gradually widen to the ankles, and the feet are those big, clunky, shuffling feet of a wookie. The torso is, again, narrow at the hips and widen at the shoulders giving the mech a powerful appearance. The upper arms are molded completely in brown, and are textured to give the appearance of fur and there are brown “fur” highlights on the forearms as well. The lower “quad” cannon is actually just a double barreled cannon that is removed to become Chewie’s bowcaster. The Falcon’s cockpit is removed and can be placed on a hole on either of Chewie’s shoulders, sort of like the battery rocket launcher on the G1 Soundwave figure. That brings us to the figure’s head, and this is the feature that really makes this a great figure. The head evokes a fierce wookie warrior, baring his fangs. The head appears to share the brown fur motif found throughout the rest of the figure. However, if you look a little closer you see that the “fur” is not fur at all, but actually a series of lines and cables. Up close the head is completely mechanical and robotic looking (or at least a mechanical facsimile of an organic head), but seen from afar the figure simply looks like a wookie dressed in a suit of armor. Chewie’s mech figure more than makes up for the shortcomings of his human half.

SWTF Falcon 4

Vehicle Mode
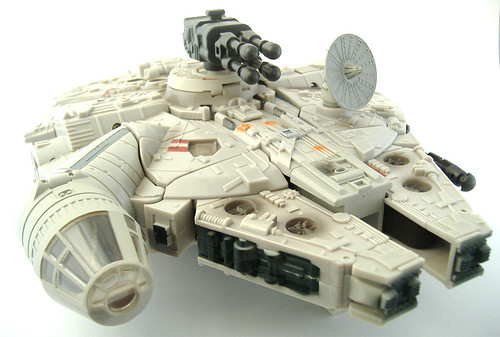
It works, and it doesn’t. Let me explain. I’m not going to complain that the vehicle is out of scale. I understand that the toy’s designers basically had to make a flying saucer transform into to relatively convincing humanoids. So sure, the Falcon may be too thick for it’s length, or too long for it’s width or whatever. It’s still in the shape of the Millennium Falcon, and it’s still got all the little bits and pieces and hunks and chunks in the right places. No one is going to look at this and confuse it for the ship from The Day the Earth Stood Still, so in that sense the vehicle works. Each half also features a battery powered light and sound feature operated by a button. The front section lights up (actually in the same exact place that the Falcon for the 3 3/4 in. action figures lights up). By pressing the button and letting go, you can hear someone doing a passable Harrison Ford impression giving some classic Han catchphrases like “I’ve got a bad feeling about this.” By pressing the button and holding it down, you hear the sound of the Falcon’s quad cannons firing. The back section lights up where the Falcon’s engine exhaust is located. By holding down the button you hear the sound of the Falcon’s engine roar and the light come on. By pressing the button and letting it go, you can hear such classic Chewie catchphrases as “Rwoooaaarhhh” and “RwoooAAARRRHHH.”

SWTF Falcon 1

My problem is with the accessories. The upper quad-cannon, the cockpit, and the radar dish are all way too large. These are actually removed during transformation, so it’s not like they are hiding Han’s head or Chewie’s foot inside. The result is that the abnormally swollen cockpit, which could have maybe passed for a shoulder-mounted cannon, ends up looking like Chewie has an abnormally swollen cockpit on his shoulder. The freakishly large upper quad cannon becomes Han’s freakishly large blaster pistol. I’ve always questioned the placement of the radar antenna on the Falcon because the gunner in the upper quad could have accidentally shot the antenna. Well, on this toy the gunner doesn’t have to worry about SHOOTING the dish so much as he has to worry about knocking the antenna off with the barrel of the cannon. Then there’s the placement of a spring-loaded missile launcher on the toy. Okay, so the Falcon had torpedo launchers, but in the films, these launchers were placed between the mandibles. The spring-loaded missile launcher is on the left side of the hull, and it sticks out about 3 inches, which makes the Falcon look like it’s flying around with a mutant pitot tube (Hey, there’s the name for my next band, The Mutant Pitot Tubes. I called it first!).

Final Verdict
In the end, what it looks like, at least to me, is that the toy designers did a fantastic job of designing the Falcon itself. Then they had to go and screw it up by making all the parts that stick out just too darn big. The Han mech is OKAY, no worse than any of the other figures I have, but Chewie’s mech alone COULD justify full price for this toy. If you find it on sale, I’d say pick it up.

2/12/2007

Transformers Classics Series: Ramjet - Review

Purchased at: Wal-Mart
Price: $9.99

I grew up in an area that did not have cable television. There were not enough houses per square mile for the local cable company to justify serving our area. We tried once and were told that all the houses within a certain radius would have to sign a service contract before they'd do it, so we were stuck with VHF and UHF. Because of this, my introduction to the Transformers was mainly through toy catalogs and seeing the figures on toy shelves. Sometimes I went home with friends who were lucky enough to have cable, so I'd make them let me watch Transformers and GI Joe, but other than that I was on my own. It was up to my imagination and what I could get from the bios on the back of the toy packages to develop the characters. Being an avowed airplane nut, the Seekers were the group I was most interested in and tried to learn the most about. Naturally, I’m in hog heaven since Hasbro has already released half of the six members of the group (I only count the original six), Starscream, Skywarp, and Ramjet.

Vehicle Mode

Classics Ramjet 1

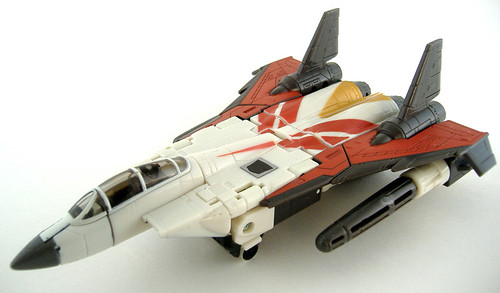
While Ramjet is based on the original Classics Starscream figure, it isn't a simple repaint. There are some fairly significant mold changes as well. The most notable changes in this mold are to the wings and the aircraft's nose cone. First, the Starscream/Skywarp figure's nose is made of three main "pieces" (I'm not counting the separate parts, like hinges, rubber tipped nose, canopy, etc.); a front half, back half, and the head (the face of which is hidden in this form). Ramjet's nose cone is greatly simplified, with only two "pieces", a front and back half. The front half is new to this figure and more rounded and about a half inch shorter. Where Starscream/Skywarp's vehicle is based on an F-15 Eagle, Ramjet's shortened nose looks more like it belongs on an F-14 Tomcat. Although the canopy is molded the same on each toy, it is proportionately larger on Ramjet (the F-14 is a two seater and has a longer canopy than the F-15, which is usually a single seater.) All three toys have a "roll bar" molded into the front of the canopy glass, characteristic of the F-14 but not the F-15. The canopy is molded in a clear dark gray plastic, which gives it a tinted appearance. The other major change is to the wings. Starscream/Skywarp's wings, again, are based on the real world F-15. Ramjet's vehicle mode instead is delta winged. The wings are dihedral (upswept) except for the wingtips (about the last 5mm), which are anhedral (down swept) and also forward swept. (SIDENOTE: Wings that are both anhedral and dihedral are sometimes referred to as polyhedral). Since the delta wing goes all the way to the tail of the aircraft, the traditional F-15 vertical and horizontal stabilizers are gone. Instead, what looks to be two huge rocket boosters are molded into the wings, and the vertical stabilizers are molded onto the top of these. The rocket boosters are a nice addition, since Ramjet's bio says that he prefers to ram his enemies rather than dogfight with them. The rockets would give Ramjet that extra little kick needed. Ramjet's wingspan is less than Starscream/Skywarp's and this in addition to his shorter nose makes him appear like a smaller, more maneuverable aircraft. Ramjet's missile launchers are the same as those found on the previous two molds, but the missiles themselves are different. Where Starscream/Skywarp's missiles are slender near the middle and thicker near each end, Ramjet's missiles are more shaped like a torpedo or the bow of a submarine; they are thick all the way through and taper to a dull point near the end.

Robot Mode

Classics Ramjet 2

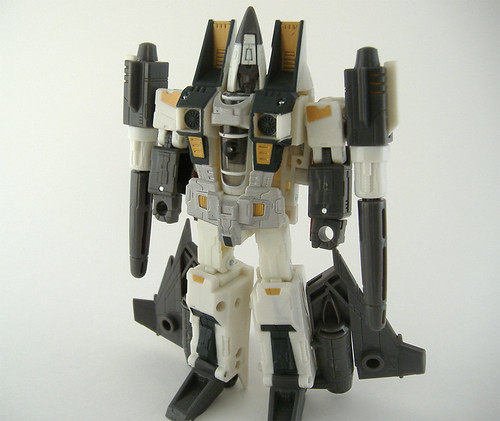
Transformation is the same here as the other two Seekers, except for the head. On Starscream/Skywarp, the nose is rotated 180 degrees, the front half is flipped back to reveal the head, and the head is rotated 180 degrees to reveal the face. On Ramjet, the whole assembly is rotated 180 degrees just like Starscream/Skywarp, then the front half is again rotated 180 degrees to reveal the robot's head. This is done so that Ramjet would have his traditional "conehead" appearance. The only downside to this is that the face is not hidden in vehicle mode. It is visible on the underside of the nose. The face is entirely new, it is more solemn-looking that Starscream/Skywarp's. Because of the smaller nose cone the face is slightly smaller than on the other two figures. Like the G1 toy, Ramjet's wings remain attached to his legs in robot mode. The two hinges for the wings found on Starscream/Skywarp are here, but they are really "vestigial." I can't find any real purpose for them other than maybe to keep that part from hindering poseability and were probably included so Hasbro wouldn't have to re-do the entire mold.

Final Verdict
Another great homage/reincarnation in the Classics line. Since this figure is an almost entirely new mold rather than just a straight repaint, its worth picking up if you already have Starscream or Skywarp. My only gripe is, once again, there is no Decepticon symbol on the figure other than the "mood" sticker included on all the Classics figures. Now I'm just waiting for Thundercracker, Dirge, and Thrust.

This is probably just a problem unique to my figure. When I opened the package one of the spring-loaded missile launchers was missing. The missile itself was there, but the launcher wasn't. It was unopened so I assume this was an error from when my particular Ramjet was packaged. I have had good experiences with Hasbro's customer service with replacement of defective or missing parts. I couldn't find this figure in any other surrounding stores, so I opted to go through Hasbro rather than try to find another figure to get the launcher and then return it as "missing a part." It's going on three weeks and I've yet to hear from Hasbro regarding this problem (it's usually less than a week).

Transformers Classics Series: Battle for Autobot City; Ultra Magnus vs. Skywarp (Target Exclusive) - Review

(What a convoluted title)
Purchased at: Target
Price: $17.99 (Reg. $19.99)

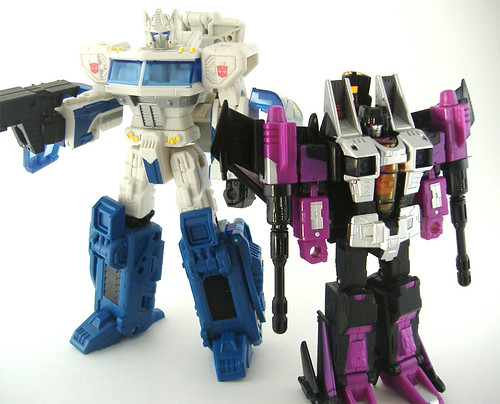
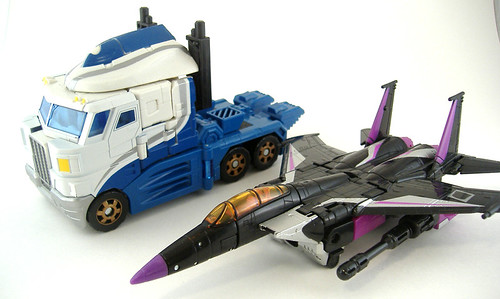
I saw this at Target the other day, and luckily it was on sale for $17.99. Since this 2-pack consists of 2 repaints with almost no physical differences between the original figures, this review will focus mainly on the changes. Ultra Magnus is a repaint of the Classics Optimus Prime figure, and Skywarp is a repaint of Classics Starscream.

Ultra Magnus
Vehicle Mode
This is a nice repaint. Instead of the figure being almost entirely white like the original G1 figure, this new incarnation features some blue along with some silver highlights to help the figure not appear so bland. In vehicle mode, some blue with sliver striping is seen on the sides of the vehicle's cab, and the rear of the vehicle is entirely blue. Where the rims of Optimus Prime's wheels were painted silver, Ultra Magnus' wheels are gold. This color works well because it keeps Ultra-Magnus from just being tri-toned. The thing I like on Magnus' vehicle mode is that the front bumper and grill assembly are painted silver. These parts are just molded in gray plastic on Prime, and the painted parts look much better.

Robot Mode Again, no physical differences. In 'bot mode, Ultra Magnus' legs are entirely blue below the knees and the forearms show some of the blue and silver striping from vehicle mode. This keeps the robot mode from looking too bland. Unlike Optimus Prime, however, Ultra Magnus has a painted Autobot symbol on each shoulder, and is the only mold change from the Prime figure that I can see. I like this addition. My one gripe is that Magnus' face plate is actually painted silver, most photos from Hasbro and even the photos on the back of the box have his mouth plate as blue, which is traditional for Ultra Magnus. I guess this was changed in production, I wish it had remained. In order to differentiate Magnus’ face from Prime's, the mouth plate is painted slightly different. On Prime, the entire plate is painted silver. On both figures there are two small indentations roughly where his lower jaws would be. On Magnus, these are unpainted and remain white. It seems that the light-piping feature of Magnus' eyes work a little better than the one found on Prime, and I believe this is because Magnus’ head is molded in white rather than blue plastic. The white plastic reflects light rather than absorbs it, and the effect makes Magnus eyes seem like they really are lit by an internal source. Unlike Prime's main weapon, Ultra Magnus' is molded completely in black plastic. This coupled with his almost completely white paint scheme sort of reminds me of a Stormtrooper, and gives Ultra Magnus that "Warrior" image.

Classics Skywarp - Ultra Magnus 1

Skywarp
Vehicle Mode
As far as I can tell, Skywarp features no mold changes from Starscream. Skywarp's current form features a little more purple and silver than his G1 figure. The black plastic is glossy and shiny, and makes his vehicle mode really stand out. The canopy is molded in an almost orange color (as opposed to Starscream's more yellow canopy). This was probably necessary so that the color would stand out, I don't think the yellow used on Starscream would hold up against the black. My only real gripe here is the actual color purple used. It's more of a pinkish-purple than the purple used on the G1 figure. I think that this figure with the original purple would have looked awesome. Some of the parts are molded in purple plastic, and some of the parts are molded in black with the purple painted over. Here the paint layer isn't quite thick enough. The black plastic sort of shows through and makes the purple two different tones when seen up close. Other than that, though, the vehicle looks great, especially when parked next to Starscream.

Robot Mode
This mode features maybe a tiny bit more purple than the original G1 figure, but stays very true to that toy. The chest is mostly silver, with a nice paint job. I think robot mode looks great on this toy. The head is molded in black, so the face is painted silver. This gives Skywarp's head a better appearance that Starscream's, which is molded in metallic gray plastic with the "helmet" painted black. On Starscream's head, the inner part of the helmet near his cheeks are left unpainted (which is probably because of the manufacturing process), and Skywarp's face stands out a little better. My only gripe, and this is also carried forward from my Starscream review, is the lack of Decepticon symbols on Skywarp's wings. If there ever was a figure that just SCREAMS for a big purple Decepticon symbol, this is it. It may seem minor to some, but I feel this holds the figure back from being truly outstanding.

Classics Skywarp - Ultra Magnus 2

Final Verdict
Minor complaints about the figures aside, I recommend this two-pack. There's just too much going for it. First, both figures are well done and deserve to be in your collection as an homage to or reinterpretations of these classic G1 characters. Second, the price makes this pack a real bargain, even if you aren't lucky enough to find it on sale like I did. The original Classics Prime is $19.99 by itself and Starscream is $9.99, so you're getting almost $30 in Transformers for the price of one. If you already have the first two figures, you still need these. If you haven't yet gotten them, or are unable to find them (maybe not a problem for Prime, but definitely for Starscream), then this 2-pack is a nice substitute.

2/08/2007

Transformers Classics Series: Starscream - Review

Purchased at: Target
Price: $9.99

I said a while ago that Soundwave was my favorite Decepticon. I retract that statement. Soundwave was one of my favorites, but my actual favorite of all time Transformer was Starscream. I was an airplane freak as a kid and Starscream was just about the coolest jet out there. He was sneaky, treacherous, backhanded, and back-stabbing, only in it for himself. His trickery and deception always failed and yet, he never gave up. For all of that, I was not one of the fortunate owners of this toy back in the 80's. When the G1 reissues came out I plunked down the full $34.99 for my Starscream reissue and that was the only time I ever felt no pangs of guilt for spending over 30 bucks for a Transformer. (Well, except for my Masterpiece Optimus, but I even then I got him on clearance for something like 45 bucks.) My son got this figure for me for Christmas, and it belongs in your collection, too.

Vehicle Mode

Classics Starscream 1

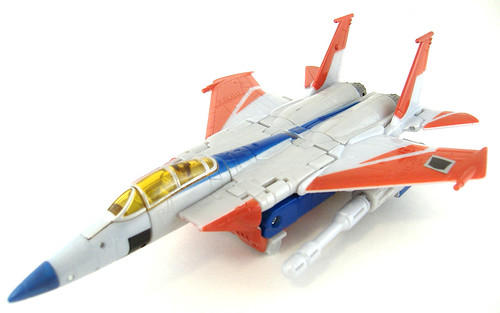
Starscream is in his classic F-15 Eagle form here. Complete with yellow canopy and dual spring-loaded missile launchers (or Null-ray weapons, if you prefer.) This figure, in my opinion, is the EPITOME of what Hasbro's Classics line should be. The original figure only brought up to the current standards of poseability. There's a tiny bit of robot kibble on the underside, and the vehicle mode is a bit chunky because of it, but if you look at the vehicle from a top-down or angled perspective you don't really notice. Also, the nose of the aircraft is a bit more F-14 Tomcat-ish. Other than that, an F-15 Eagle is reproduced with fairly good accuracy if you consider that in a few minutes it's going to be a robot. My ONLY gripe with this is that when parked Starscream does not have a nose gear, but rather two tiny wheels flip out from his chest to form the front landing gear. The rear landing gear wheels are molded into the parts that will become Starscream's feet, just like the original figure. This gives Starscream a slightly odd appearance when parked on the ramp. For an aircraft nut it's a bit offputting to see an F-15 parked without it's nose gear deployed.

Robot Mode

Classics Starscream 2

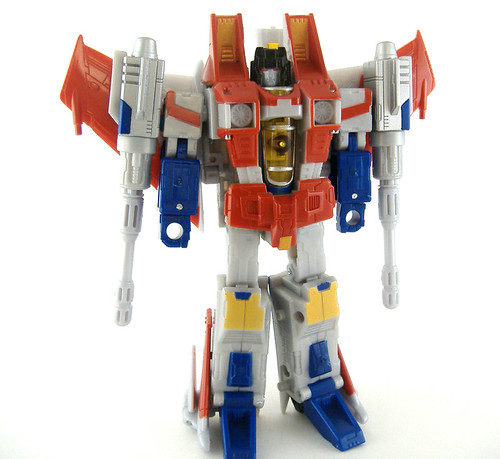
Here is where the toy really shines. I love the way the transformation is handled. First, you pull rear fuselage down to deploy the legs and fold the portions on the underside of each engine to form the feet. Where the original G1 figure the legs were unposeable, the new Starscream has articulation at the hips and knees. The hip joints on my figure are looser than I'd like, but this may just be unique to my figure. The feet hold true to original's "hollowed out on top" look. There's no clunky "pull it out and insert a different peg" transformation of the vertical and horizontal stabilizers. The Vertical stabilizers are rotated forward 90 degrees, and the hinged horizontal stabilizers are folded up parallel with the vertical stabilizer. The upper body's transformation is what I really like. On the original G1 figure, you had to fold the nose cone down and through the figure's abdomen, this would force to nub-like arms out and you had separate pieces for the forearms and hands (well fists) that you had to keep up with when not in robot mode. On the new version, the forward fuselage opens up like a clamshell, the two arms swivel out to the side, and the hands are folded up in the forearm. Once the arms are out of the way, the nose of the aircraft is rotated 180 degrees, the cockpit is on a hinge that allows it to be tucked down in the "clamshell," which is then closed. The nose cone is simply flipped back to reveal Starscream's head. You rotate Starscreams head 180 degrees to see his face (his face is hidden in robot mode, unlike the original figure.) The two front landing gear wheels (if deployed) are folded back into Starscream's chest and become his characteristic "pectoral turbines." The only bit of kibble located on the figure in robot mode are the wings and the front portion on the nose cone, which hangs off the back of Starscream's head. The wings are iconic of the G1 Seekers and it would have been a travesty to do anything else with them. The original G1 figure also had the nosecone hanging off the back of the head, so I can't really complain here.

My one gripe about the figure, and it's something I carry forward from my review of the Classics Optimus Prime, there's no Decepticon symbol on the toy at all. There's the mood sticker on one wing, but again, this only seems like an afterthought. (Now that I think about it, NONE of the Classics figures I own have a painted on Autobot or Decepticon symbol, they all come with a simple mood sticker. What gives?) A Decepticon symbol on each wing, like the original figure, would have made this the best looking Starscream toy ever. As it is, I hold this one in about the same regard as my Armada Starscream. Sure it's no where near as poseable, but he had raised and painted Decepticon symbols on his wings (which, with a little gray paint in the recesses, looks AWESOME) and came with that classic Starscream smirk.

Final Verdict
Once again, minor complaints about the lack of Decepticon symbols aside, this is an excellent figure. Hasbro is two for two in its Classics line. Run, don't walk, to your local Mega-Mart and pick this figure up.

Transformers Classics Series: Optimus Prime - Review

Purchased at: Wal-Mart
Price: $19.XX ($19.87, I think)
(Sorry for the lack of pictures. My digital camera is broke. I will provide them when it gets fixed.)

I got this with some Christmas money. I actually paid full price for this one, which I don't usually do for Transformers over the $9.99 price point if I can help it. I'm glad I did, because this is an excellent figure with only one REAL complaint I can think of.

Vehicle Mode
Classics Prime 1

Optimus is in his classic vehicle form, a tractor (as in tractor-trailer, not as in farm) with a mainly red and blue paint scheme. However, instead of his usually, boxy, flat-nosed, cab-over-engine appearance, Optimus has been given an appearance that is a tad more streamlined. Instead of his cab being shaped like a box, the windshield and front bumper are rounded off at the corners, and he also comes with a nice big wind vane over the cab. This wind vane can be removed, but it covers up the area where Prime's head is stored, so it helps with his appearance. There are some silver details painted on the sides of the cab, wind vane, and the rims of the wheels. The front bumper is molded in plastic gray, and I wish this had been painted in silver to match the rest of the truck, but this is a minor complaint. There is a separate piece that forms the smokestacks. In all, I think this is a very good "modern" interpretation of the classic Prime we children of the 80's grew up with.

Robot Mode
Optimus shares a standard transformation scheme with most of his predecessor. The rear portion of the tractor folds down to become the legs, the arms unfold from the cab, and the head flips out of the top of the cab. The legs must be rotated 180 degrees once they are folded down in order for his feet to be facing the correct direction. The neat thing here is that rather than have the rotation occur at the hips, the rotation actually occurs on a joint just below the chest section. The result is that Prime's big blocky front bumper and tires are also rotated behind his body, leaving a nice, slender waist and keeping Optimus from looking like a tractor cab with legs and arms (Energon Optimus, I'm looking at you.) The wind vane is angled back and is either left there as a sort of back armor, or can be removed and transformed into a long-range looking blaster. The head is simply flipped up out of the top of the cab. My figure had the face facing up, but I turn the head around 180 degrees and have the face looking in, that way I can remove the wind vane and still have Prime's face hidden in vehicle mode. The smokestacks are removed and folded together, this forms Prime's main weapon, a double barreled blaster. The blaster is molded in black plastic, but the main barrels are painted in silver. The only real complaint I have here is what happens with the forearms. The side window portion of the cab is folded out and over the forearms during transformation and they just sort of stick out on the sides. This leaves Optimus with the only bit of "kibble" (parts of from vehicle mode that just sort of hang off the side, but serve no function) on an otherwise sleek looking robot mode. Again, a minor complaint. Prime's eyes are clear blue plastic, and are light-piped. Prime's "helmet," as usual is molded in blue, so the clear blue portion on the back of the head that pipes light to the eyes does not stand out. However, because the blue is such a dark color, the light-piping effect is minimal in normal ambient light. You have to be looking head on to get the effect at all. Again, minor complaint as the eyes could have just been opaque blue plastic.

Classics Prime 2

My one REAL complaint with this figure? There's no Autobot symbol! Sure, there's a heat sensitive "mood" sticker that, if you place your finger on it and wait...oh...about 5 minutes, the Autobot symbol shows up (these mood stickers don't work as well as the original G1 stickers.) But even this is stuck on the side of the cab and seems like an afterthought at best. Sure, I understand the whole "Robot in Disguise" motif, and I don't want my 'bots going around in vehicle mode screaming "I'm an Autobot/Decepticon!" But because of Prime's transformation scheme, that red Autobot symbol would have been perfect if they had put it in the usual place, his shoulder, as the symbol would be hidden in vehicle mode. Hasbro, this is Optimus Prime we're talking about. Leader of the Autobots. He needs to wear that Autobot symbol proudly.

Final Verdict
Even looking at that minor gripe, I can't find any reason not to tell you to run out and buy this figure, now. Except for the Masterpiece Optimus, it is probably the BEST Optimus Prime figure ever released domestically. With all the other lines OP's (Armada, Energon, Cybertron) being around the $40 price point, it certainly is the best bang for your buck.

2/06/2007

How to Assemble a Gundam Model - Cheaply

I've been putting Gundam models together for close to 10 years. I don't claim to be an expert, but I've learned a lot through trial and error. When I started, I tried to find information out there to help me start, but most stuff assumed that the reader was already proficient in modeling, so I basically had to figure this out on my own. I wanted to share some of my tips for you beginners. IN NO WAY do I believe this is the ONLY way to do it, but I've found it to be almost hassle and frustration free. Of course, nothing works better than good old "experience." I don't paint my kits completely, mainly because I don't have the time (or talent), but I will paint the small detail parts if not molded in the correct color, or you are given a sticker to put on the part instead. These techniques aren't just for Gundam models, you can apply this to most Bandai, mecha, and Japanese kits.

Most Gundam models, especially the HGUC (High Grade Universal Century) and MG (Master Grade) kits, indeed most of the modern kits released by Bandai (which makes model kits for most mecha anime properties, it seems) look good right out of the box with most parts molded in the correct colors. I do plan, one day, (when I have more time and less children in the house) to fix up a painting rig and paint the kits, so I am in no way bashing those who show their models a bit more care and love than I do.

The FIRST thing to know is that you DON'T HAVE TO BUY YOUR SUPPLIES AT A HOBBY STORE! The stuff there is typically too expensive and too cheaply made. Most of the stuff you need you can find at the cosmetics department of your local Wal-Mart or mega-pharmacy. (For you men, don't fret about the thought of you hanging out in finger nail polish section. I do it all the time.)

Things you will need: 1) A Gundam model kit (obviously). The best place to buy these is HobbyLink Japan. Largest selection, lowest prices. The only drawback, these are shipped from Japan, so it will take a few weeks. The wait's worth it.

2) Something to cut the parts off the parts tree or sprue. Please avoid those specialty clippers you see down at the hobby shop. A pair of fingernail clippers works just fine. You don't have to get a fancy pair with a nail file and a little blade that digs gunk out from under your fingernails, just a plain old 99 cent pair will do. Plus, you can also use them to trim your fingernails. A Multi-tasker!

3) A GOOD hobby knife. I recommend a #2 knife made by X-Acto. The handle on the #1 knife is a bit small, so if you have smaller hands, you may like it. I spent $20 on a "Hobby Knife Set" at a hobby store, which was essentially a cheap knock-off of X-Acto's Basic Knife Set (which, as it turns out, sells for the same price at Wal-Mart.) Within three months, the magnet that held the extra blades in place came loose. Even worse, the blades began to rust and eventually became completely unusable. X-Acto's Basic Knife Set is pretty nice, but to be honest I've never used half the blades in my set. The blade that comes with the single X-Acto is perfect, and you can buy replacement blades in packs of 5 for about 99 cents. Please do NOT use a cheap imitation here. Cheaper knives have blades that dull very quickly. As any cook or chef can tell you, a dull knife is much more dangerous than a sharp one. You'll use more force to make a cut, and when it slips...GOODBYE FINGERTIP! (I've sliced my thumbs and fingers open enough times to know. Even a dull hobby knife cuts pretty deep.

4) Model Cement. I recommend the kind from Testor's that comes in a black triangular "tube" with a narrow plastic tip. (They used to make it with a metal tip that was MUCH better, but I guess it also made a good prison shank because they changed it to a tapered plastic tip.) There's a basic difference between model GLUE and model CEMENT. Model glue dries between two parts, and as the moisture from the glue dries, what is left behind is what forms the bond between the two parts. Model cement, on the other hand, actually melts a thin layer the polystyrene plastic and as this dries the plastic simply re-hardens. This basically "welds" the two halves together. I find this bond to be much stronger than the bond from model glue. Also, since the glue leave behind a trace layer between two halves, they will be a tiny bit wider than if you use cement. Since cement does not have this tiny layer, you get a better fit between parts.

5) Something to file and smooth the plastic parts. Sure, you can go down and buy that fancy modeling sandpaper most hobby shops sell. But I just use a simple finger nail file. I USED to use a two-sided fingernail file made by Fing'rs. It had one side that was half pink and half white that was two different "grits," one coarse and one fine. The other side was a gray "buffer." I can't find this one any more, so I found a brand that is essentially the same thing, only on three different finger nail files. A finger nail file is much easier to control than sandpaper, and you can fit it into tighter spots.

Optional Tools 6) Clothes pins (the kind with springs, not those old-timey ones.) 7) Q-tips 8) Cosmetic sponges (Ask your mom, sister, wife, or girlfriend.) I like the kind that is triangular or wedge-shaped. 9) Paint brush. Camel or other natural hair. Don't buy those el-cheapo brushes in Wal-Mart. Those are only good for...well, I don't really know what they're good for. Natural hair bristles are very thin, and make a hand-paint job look good. You can find a good brush for under 2 bucks. I have two brushes that I use, one that is a camel hair 1/4 inch (width) brush which cost $1.20, and a camel hair Detail brush (which has maybe 5 bristles, and tapers to a point). With these two brushes, you can paint anything from large areas to tiny little details like eyes. 10) A few sheets of Foam Rubber. (You can usually find this in a teacher supply store. Sometimes with letters and numbers molded into the sheets. These are only a couple of millimeters thick.) 11) Future Floor Wax 12) Cosmetics Brush (the kind used to apply blush, usually.)

There, that's basically all you'll need. Other than the model, that's what, maybe $10 bucks worth of supplies? Most of these you probably have laying around the house, anyway. Go spend $10 down at your local hobby store and see what that gets you.

Assembly This is the basic assembly pattern, and you should use this on each final "piece" (foot, leg, arm, etc.), and not the entire kit as a whole.

1) Read the instructions! Even though most Gundam kits are in Japanese, they have nice pictures that are clear and easy to understand. Even though most Gundam kits (especially the 1/144 scale) follow a similar construction method, there may be a twist or turn that, if you miss, can be tough to fix once the parts are glued...err, cemented together. Also, don't go cutting all the parts off the sprue at once. Keep the parts on there until you need them. If you need to paint something, its easier to hold the sprue than it is to hold that tiny little part (Of course, if you want to paint, say, a whole leg, you're going to have to put the parts together before you paint.)

1a) Wash your parts trees in mild soapy water. Rinse, shake off the excess water and allow to air dry. (I'll explain why below).

2) Using your clippers or other cutting device, cut the part off the sprue (do NOT use your hobby knife for this, this will dull the blade quickly.) The trick here is not to cut the part too close. What I mean is, don't cut it right where the sprue ends and the part stops. You'll leave a divot, and this is not repairable without using putty. You want to avoid having to go get some. What you want to do is leave a little part of the sprue on the part, just a couple of millimeters, but enough so that you are not cutting the actual piece that is left. When finished, you should have the part you need, and it should have little "tabs" everywhere the part was attached to the sprue.

3) Using your SHARP hobby knife, trim those tabs off. The technique to use here is to place the edge of the knife's blade right at the point where that tab joins the part. Then, keeping the blade parallel to the part's surface (if it's flat), or nearly so (If it's rounded), apply gentle pressure and "shave" the tab off. You may have to do this a couple of time to get the part smooth. Practice this a little. Too little pressure and it will take you several attempts to get the tab cut off. Too much pressure and you may gouge the part's plastic. THIS IS NOT REPAIRABLE without extensive work.

3a) Put any polycaps in place if applicable. Polycaps are the small, rubbery plastic pieces (usually gray in color) that are used to form elbow, knee, and ankle joints. Some of the older 1/144 kits also used this for the kit's hands. Gundam kits are usually poseable, and a polystyrene on polystyrene joint would wear out very quickly. Polycaps are very durable, as well as soft, so the joints are very stable and can hold a position. DO NOT SKIP THIS STEP! I can't tell you how many times I've realized I forgot this step right after cementing the parts together. The resulting string of expletives can usually make a sailor blush. Check and Double-Check that you've done this before moving on!

4) Cement the pieces together. Here's where the specific Testor's cement I recommended comes in handy. It has a very slender applicator tip. What you have to do is cut the very end off the tip. Cut it very close to the end so that the hole the cement comes out of is as small as possible. Model cement is a clear liquid that is about as viscous as milk, so you have to be very careful with it. You don't want it running out all over the place. (You especially don't want it running out all over the plastic piece. Remember, this stuff MELTS plastic.) Usually, the parts of a Gundam model, if not a single piece, are molded from two separate "halves," either a left and right half or a front and back half. What you're going to do is run a VERY THIN layer of cement around an entire half (where this half will be touching the other half. The surface you are applying the cement to should be perpendicular to the outside surface you will actually see.) You may even want to very gently sand the two halves to remove any debris and level off and abrade the surface to give the cement something to hold on to.

NOTE: The current trend in some model kits is to have the joint actually contained within a "panel line" on the kit. (A panel line is a recessed line on the surface of a model that simulates a panel, armor plate, or two separate pieces of metal. Take a look here. All those black lines on the surface of the model are panel lines. If the gap between the two halves will be in a panel line, don't put cement here. You'll see why below.
Once you have applied cement to one half, CAREFULLY join the two halves together. Take care not to get any cement on your fingers. You won't notice until you put your finger tip on another piece of plastic and it sticks to your finger. It will etch your fingerprint into the model's surface. Once the halves are joined, apply gentle pressure to squeeze the two halves together, and count to 20 (one-mississippi, two-mississippi). If you did this properly, the cement (actually melted plastic) should be forced up out of the seam between the two halves. If you didn't apply too much, it will just form a little ridge and not run out everywhere. If you didn't apply enough, none will run out. This isn't bad, the two halves will still join together as long as there is SOME cement, it's just not ideal. Set the piece out of the way and let the cement cure. Overnight is good, 24 hours is better.
NOTE:If you have some clothespins and foam rubber sheets, here's where they come in handy. You can make a make-shift vice by cutting a few strips off your sheet of foam rubber, and gluing these (Elmer's works fine) to the inside of the gripping end of the clothes pin. You can use this device on smaller parts to maintain pressure on the two halves until the cement cures. The little notch in the clothes pin is perfect for some of the smaller pieces. Just be careful you don't get cement on anything, or you'll have a mess on your hands.
5) Once the pieces have cured, you have an actual PART. A leg, a forearm, shoulder armor, a head, etc. But you also have that ugly little ridge of cured plastic sticking up between what used to be the two halves (remember, you've welded the plastic together, now its truly one piece of plastic.) You've got to clean that up to make it presentable. No problem! You're simply going to use the same technique you used in shaving those tabs off the parts you have cut off the sprue. Place the blade parallel to the part's surface, and hold it about a 30 degree angle. Use the same motion you used to "shave" that tab off, only shave off the ridge of plastic that came up out of what used to be the seam between the two halves. When you get done, you should have the surface should be flush and fairly smooth. The plastic may be a little discolored, but you can always paint over it. It always looks better, IMO, than a big ugly seam-line.

6) Sand the parts. Use the coarse grit fingernail file, then the fine grit, and finally the buffer. If you do this over the former seam-line, the piece will look uniform and whole, and shiny to boot! Sanding also helps you clean up mold lines.

NOTE: Plastic models are sometimes called injection kits. This name comes from the process used to create the individual parts trees or sprues. Each sprue has an individual mold. A mold is created from two dies, a top and bottom half. These dies are pressed together to form the mold and molten polystyrene plastic is INJECTED into the mold. After the plastic hardens, the two dies are removed and what's left between them is the sprue. A tiny bit of lubricant is sprayed into the mold before the plastic is injected so that the finished product will release from the mold, this is why you should wash your kit before assembly. Unfortunately, the dies are not always aligned correctly (sometimes off by a nanometer), and this will leave a mold line. The dies may also not be completely pressed together, (they wear out over time) and a small amount of plastic will run between the dies, leaving behind a small imperfection called "flash." If you ever played with green army men, you've probably seen flash and mold lines before. The flash was usually a small circle on the back of the helmet, from the point where the plastic was injected into the mold used on the figure. Flash is VERY uncommon on more modern kits, at least those made by Bandai.
There you're mostly done, and could stop there, but your kit may not look quite right.

7) Painting. Paint any parts that are not molded in the correct color (you don't have to if you don't mind color inaccuracy.) I recommend Acrylic paints. These are water based and are easier to clean up than enamels. You just have to wash your brush in water. Enamel paints are oil based and require thinner to clean your brush. But don't IGNORE enamel paints! Enamels are usually thicker and are great for painting smaller details. I can't stand the way red polystyrene looks (too...uhh...plastic-y), so I always paint anything that's molded in red. Paint anything that you are given a sticker for (don't put the sticker on, though!) These are usually eyes things like eyes, scopes on weapons, cameras and sensors. Also, you should paint the inside of the models vernier (rocket) nozzles either black, red or yellow. (look to the pictures included with the instructions for guidance.)

7a) Once you've finished painting, you may want to seal the paint. Model paint is very delicate and can easily be scraped or scratched off. Here's where the Future Floor Wax comes in. Brush a very thin layer of Future over any part you have painted, and the paint job becomes nearly indestructible. Okay, not really, but it will be more durable than not sealing the paint. However, keep in mind that Future will leave your paint with a gloss or semi-gloss finish, so I wouldn't do this on anything you want to have a matte finish. There are paint sealers specifically made for plastic models, including matte finishers, but I never fool with them. Future is also acrylic, so cleaning up your brush is a snap.

8) Put your finished model kit on a shelf and admire it from time to time.

9) Your kit will get dusty from time to time (unless you keep your house spic and span.) Whip out that make-up brush and GENTLY use it to brush away the accumulated dust.

2/05/2007

Hi

This was sparked by Hasbro's decision to release a second Ravage figure in their Alternators line. It will be a discussion...nay, a celebration of little plastic thingys. Mainly toys and models in the Transformers and Mobile Suit Gundam realms, but I will also toss in other things that hold my interest. Star Wars, Evangelion, movies, video games. Wish me luck!

First up, just a comment on the new Transformers: Alternators figure. I'm jazzed (hee hee). This is the first Alternators figure I've been genuinely excited about. When I happened upon Smokescreen (the first Alternators figure released in the US), I quickly snatched it up because he was just oozing with G1 goodness. Likewise for Hound, which I got only after a few weeks deliberation. I got Deadend because it was on sale for $12.99 (reg. $19.99). Shockwave is probably my favorite Alternator in my meager collection (which consists of of the four previously mentioned, and Optimus Prime, whom I mostly picked up because I have what my wife calls a "Bot Crush" on all things Optimus. I felt obligated.) But this figure, with its feline appearance, those sweet missle launchers attached at the hip, it just screams G1. Soundwave was always my favorite Decepticon. He had all the characteristics of the "good" (IMO) Decepticons...cold, calculating and, most importanly, emotionless. Rumble and Frenzy were irritating little punks, and Laserbeak always seed to be more interested in Megatron's approval than that of his host-bot. Ravage, however, was Soundwave's right-hand bot. He operated in Shadow and was not afraid to spy on his fellow Decepticons. He was always a loner, aloof, which I readily identified with. I'm glad Hasbro has returned him to (feline) form after their lackluster Battle Ravage figure.