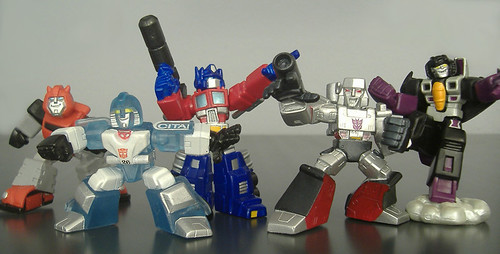
Mirage is a clear version of the 2-pack version and, truth be told, I'd have paid 10 bucks for this figure alone. He's just plain awesome.

Mirage is a clear version of the 2-pack version and, truth be told, I'd have paid 10 bucks for this figure alone. He's just plain awesome.
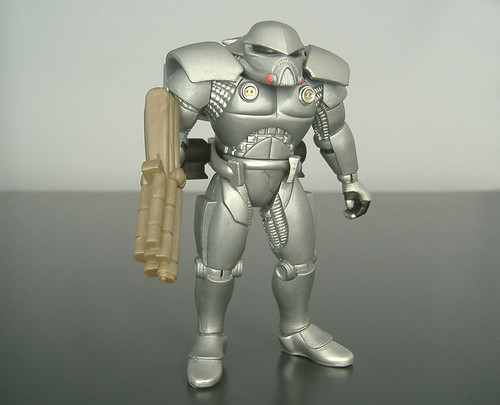
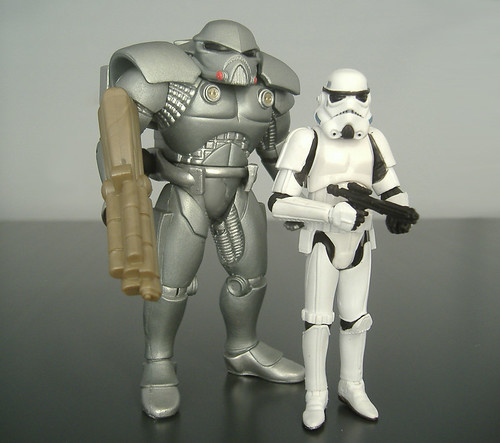
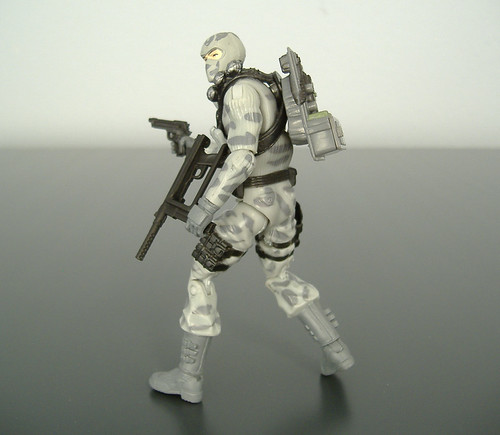
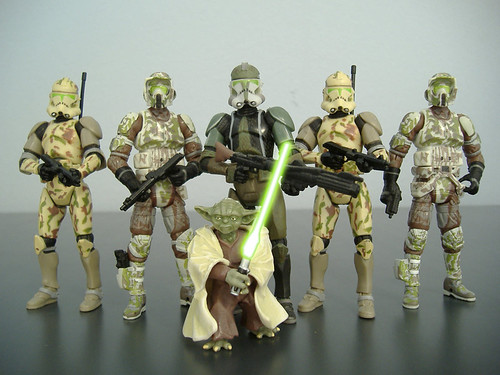
I saw this guy sitting on the pegs at Wal-Mart. I like the Darktrooper design, and I guess this goes back to the days when I used to sit hunched over my old Win 95 PC and wasted time playing Dark Forces. Whatever the reason, I snatched this figure up and ripped him open when I got home. I really have mixed feelings about the figure, though. On the one hand, it is a very striking design; bulky, larger than the av-er-age bear, and sort of gives you the impression of a 'roided out Stormtrooper (and not "'roided out" in a bad way like the figures from the late '90's POTF2 action figures.) On the other hand, it has the same poseability as the Star Wars figures we all grew up with in the 80's. It has a whopping five points of articulation, the neck, the shoulders, and the hips. For this reason, the Darktrooper can hold extremely exciting, striking poses like this one...

...and...well, that's about it. Visions of putting him in sweet, Battlefront II mid-jump poses quickly evaporated. The sad thing is, the thing is big enough to have put some elbow, knee, and ankle joints. It's a nice four inch tall statue and that's about it. Actually, now that I think about it, my old Stormtroopers from the 80's don't have neck joints, so the Darktrooper is one up on them. SCORE!
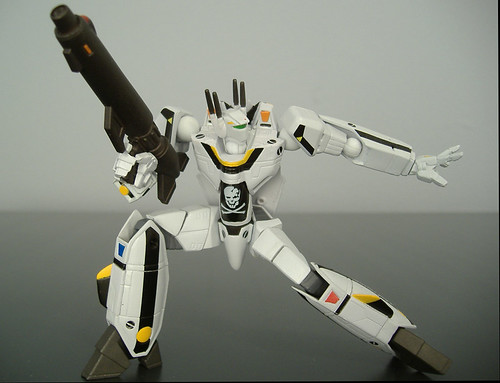
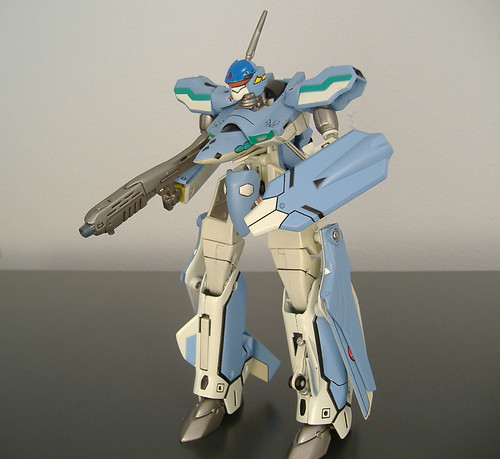
This thing is pure plastic joy. And it comes with just about anything you could want for a VF-1, including its very own little Revoltech-y FAST pack. The only shortcoming is that it doesn't transform, but that's not what Revoltech figures are about in the first place. If you want a cool transforming Valkyrie that won't set you back 90 bucks, check out Toynami's offerings. If you want a Valkyrie figure that will get into just about any iconic Robotech pose you can think of, this one is for you.

Revoltech has yet to disappoint me. Sure, I have to whip out the Dremel every now and then to get every joint perfect, but that's a minor quibble when the figures are so much fun to play with. I spent about an hour just putting my VF-1 into any pose I could think of and I only quit because my wife and kids were giving me funny looks. This may just replace my Toynami Valk as my favorite Robotech toy.
Unfortunately, any sweetness points Jazz gets for his awesome alt-mode are completely lost because of this monstrosity...
While I don't like the movie designs, I thought Jazz was actually kind of sleek and athletic looking in the film. Unfortunately, the toy's bot mode is stocky and, like one of my old high school girlfriends he's got thunder-thighs. What the hell is up with his hands? He doesn't even hold his "sword" (as the packaging describes his weapon, even though it is painfully obvious this is a sniper-rifle)(albeit, assembled with an upside down barrel) in his hand, it attaches to a hole on the inside of the forearm. I'm really leaning toward getting Takara/Tomy's Encore Jazz that will be released later this year/early next year (I forget) just to make up for this...thing. Jazz gets an "A+" for alt-mode, and "F-" for bot-mode. I doubt I'll ever take him out of alt-mode again.
Words can't describe how awesome this figure is. It's not the most advanced figure ever, nor the most detailed, but as far as play factor and the ability to hold kick-ass poses, I'd rank him right up there with Classics Mirage and my Toynami VF-1A Valkyrie (pictures of that one to come). So here Firefly is in all his awesome, saboteur-ish badassedness.
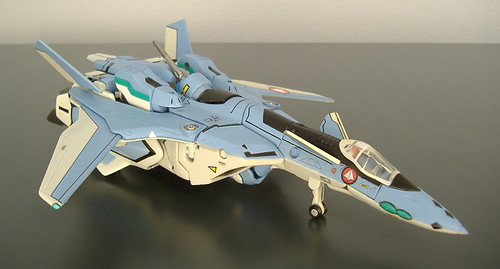
It's probably the best looking and least fun Variable fighter I own. It's partially die-cast. It's heavy. Because of its design, I ended up chipping some of the paint of during the first trasformation. To top it off, some of the gray plastic is starting to yellow. I keep this thing in a room that the sun never shines directly on. I keep the blinds drawn at all times, and it still yellowed slightly. GAH!!!
Some robo-plastico die-castico love. Hail to the King, baby!
I'm usually not too big on repaints. Not because I don't like them, but because the obsessive compulsive in me would want to get them all (which is why I've avoided the Episode II version Clone Trooper, I'd have to get the blue one, then the red one, then the yellow one, then the green one, it never ends.)
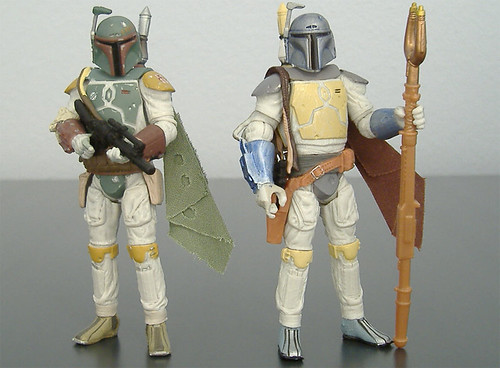
However, I'm a sucker for Boba Fett. Not because he kicked butt in the movies or anything, just because he's one of those guys in the Star Wars Universe that as a kid you like to dream up his back story and imagine him in all sorts of bounty hunting adventures. Pretty much every Boba Fett action figure Hasbro has released up to this point has sucked (not counting the original one my dad got me and stashed in the glove compartment of his Chevy Nova when I was 6), from the 'roided out versions from the 90's to the permanently bent-elbowed version released prior to this figure. However, this one is almost perfect, from the dented armor to the proportions (not bulky, not too tall).
When I first saw pictures of the Animated Debut version, I was kind of "meh" on it. However, I had to snag it when I actually saw it up close. I like the muted color scheme and it really makes this figure stand out, if that makes any sense. Hasbro even changed the Boba Fett's cape a little bit. Where the movie version is tattered and frayed, the Animated Debut is neatly trimmed. Plastic addicts can pick up either one of these without fear of being disappointed.
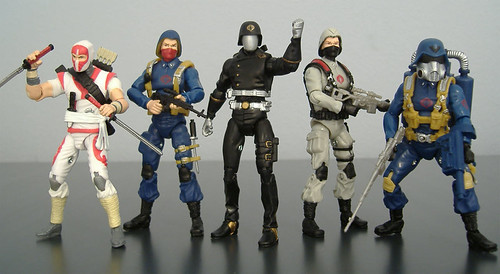
I really like the Cobra Commander in this set. Not being too keen on GI Joe lore (except for what me and my brother dreamed up when we played with ours as kids), I think if this one as a kind of ceremonial dress, like for when a Cobra Trooper is promoted to the ranks of the Crimson Guard or something. I also like the Cobra Vehicle Driver since he's a little different than your standard blueshirt.
Of the three Storm Shadows released thus far, this is my least favorite version. The Air Trooper is a cool concept, but its a little hard to get around the "gas mask" helmet. I wish Hasbro would just go ahead and release the Cobra Trooper found in the first Cobra 5-pack with the standard black webgear and red Cobra Logo, the one in this pack is just a mediocre substitute.
I went through the self-checkout lane when there was a problem. They weren't ringing up on Clearance. Screw that! I don't need Cliffjumper THAT bad. (I'm glad I got him, though.) I decided to void those off and just get my stick of deodorant and split. No dice, the register decided that I couldn't just not want the toys anymore, one of Wal-Mart's highly trained professionals was going to have to come punch in a 4-digit code to verify that I, indeed, did not want the figures anymore. The guy came up, balding, mid-40s, "You collect Tranformers?" Ah jeez. The only thing I hate more than kids that ask me that question is grown-ups that ask me that question. Through trial-and-error I have found the response that usually diffuses the situation "Nah, I just buy them for my son." Usually that shuts up any inquisitive post-pubescent.
This guy wasn't having any of it. "Well, I don't think there's anything wrong with it even if you did. I think they're cool." I decided that I needed to look more like a responsible adult and less like a pathetic loser, so I switched to concerned consumer mode. "Well, I came in this weekend and bought one of these for my son (emphatically emphasized). They were ringing up on clearance, but they aren't now." "Really? That's strange. Yeah, because I seen these things on sale. Let me check on them."
Okay, I can play around for a little bit if its going to save me some money. He called an even more professional Floor Manager over and explained what was going on. She seemed unconcerned. "Well, we have price changes ALL THE TIME!" she huffed. Hang on, chick. I'll let it slide that your computer is messed up and isn't ringing up on clearance when it should, but I'll be damned if you're going to tell me that the prices were changed when they were on the CLEARANCE aisle this weekend and they're still on the CLEARANCE aisle today. "Really?" I asked innocently, "because these are over on the CLEARANCE aisle with all the other stuff that's on CLEARANCE. That's where they were this weekend. Seems like stuff in the CLEARANCE aisle would, you know, be on CLEARANCE." I punctuated "CLEARANCE."
"Yeah, well, we have price changes all the time," (Which is bullcrap because Deluxe Tranformers have been the same price since Armada came out), and walked away.
I returned my attention to the cashier guy. "Don't worry," he said, "I'm going to get these things for you on clearance. I'm just going to call the toy manager." "Look, don't worry about it," I said, "I don't have to have them." "Oh, no, I'm going to get these the right price. You seem like a pretty cool guy. I want to help you out."
Uhhh...okay?
"I'm just going to call the floor manager, and if she don't want to fix it, I'll just override it and do it anyway." "Hey, I really appreciate it, dude." (We're all just guys here, right?) "I don't mind doing it at all. Like I said, you seem like an okay guy. You just remember that I treated you right."
Are there any witnesses around for when this guy decides to rape me?
So I got my toys on sale, but now I have to face the difficult decision, do I settle for picked-over and scalped stores, or should I try to brave the waters where some mid-40's, toy-obsessed weirdo (hey, wait a second!), tries to hit on me again.

Available in August, fully transforming, fully articulated, no parts swapping, what's not to love?
UPDATE: Uhhhh, how about the $60 price tag?
Real American Heroes (3 3/4 in.) individual figures are $1.49
RAH three packs are $2.99 and six packs are $7.99.
RAH vehicles are $5.99 - $9.99. (The R.O.C.C. is regularly $44.99 and is on sale for $9.99)
Sigma 6 figures are $6.99 - $9.99.
I guess they're making room for all the 25th Anniversary stuff.
Hasbro also has four GI Joe comics available online.
For comparison, Bandai is also releasing a Zeon Amphibious MS set that will include the Acguy, Z'Gok, and Gogg, the cost for this set will be 3000Y. Likewise, the HGUC The O kit also sells for 2400Y, so you can tell the Zock kit is going to be BIG!


An impressive array of some (I assume) vinyl Hedorah (The Smog Monster) figures.

A Fire Godzilla figure. Even though this part of the collection was titled Godzilla vs. Hedorah, this Godzilla is from a later film. (Godzilla vs. Destroyah, I believe.) I really liked this figure, it was about three feet tall and four feet long.

Some Mechagodzilla figures. The largest figure in the photo was about 8 inches tall, so you can get a sense of scale for the Godzilla figure, that's its tail in the background.

Some Tetsujin 28 (Gigantor) figures. My favorite figure in the whole collection is the second largest figure in this photo. It appeared to be all metal, and had a great paint job.

And finally, some Mazinger Z figures.
This exhibit will be on display at the LSU Museum of Art until October 7, 2007. If you're in the Baton Rouge area, make the trip to check it out.
HGUC Zock
HGUC Gundam RX-79[G]
HGUC Blue Destiny
There's also a PG Wing Gundam "Zero" Pearl Finish, some new HCM Pro stuff, and some new Gundam Seed stuff.
Here's a diorama of some old Monogram Cylon Raider and Colonial Viper kits, which is pretty sweet.
Some people have questioned the choice of the Turn A, but considering how Turn A Gundam was a Gundam anniversary product in the first place (Gundam Big Bang 20th Anniversary Celebration), I don't really have a problem with it. Personally, I've always liked the design of the Turn A.
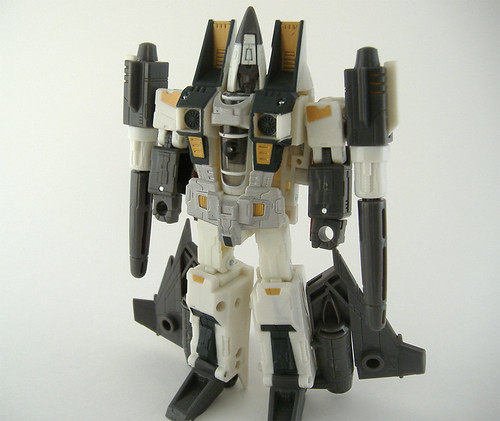
I vacillated over getting this figure. I don't know why, but when I first saw it in the store, I thought "It isn't a Valkyrie." I've always thought that the original G1 toy was the epitome of excellence in Transformers, and looking at this toy in the box the first time, I don't know...it just seemed...off.
I was wrong. The Classics Jetfire toy is one of the best toys in the Classics line, top two or three, and one of the best Transformers figures to come out in years.
Vehicle Mode

Jetfire, like most Classics figures, comes packaged in vehicle mode, which looks like an F-14 or a VF-1 Valkyrie. The toy itself feels pretty solid and is hefty for its size. It shares a lot of design similarities with the original Bandai Valkyrie toy. The paint job is a true homage to the original Jetfire figure. The wings are variable and the toy even comes with a pseudo- FAST pack that is removable. The vertical stabilizers fold flat for when you need to attach the FAST pack.

The front of the aircraft, however, is much more of an homage to the original animated Jetfire/Skyfire character. Instead of a rounded nose and cockpit of traditional aircraft, the toy's cockpit and nose are much more angular and squared off. When I first saw this I wasn't too crazy about the design, but it really works well once you get it out of the box.

The aircraft is also heavily armed, with a pair of blaster cannons slung on the underside of the fuselage, a pair of double-barreled laser cannons on either side of the cockpit, a pair of spring-loaded missile launchers, and a pair of spring-loaded fold out cannons stored in the FAST Pack boosters. I find this ironic, since Jetfire's traditional bio has always listed Jetfire as a scientist and not a true warrior. I've always preferred to think of Jetfire as a lone-wolf soldier. Sort of like Solid Snake.
Robot Mode
Yet another great job at an homage to both the original G1 toy as well as the animated character. How so? Well, the most obvious thing is the toy's head. It has a visor, and double antenna on either side of the head, just like the G1 toy (which had the head of the VF-1S Valkyrie variant). But THIS head is just a façade, a removable helmet. Removing the helmet reveals a robot with a more human face, which was a characteristic of the animated/comic character.

Jetfire is also well-armed in robot mode. The two spring-loaded missile launcher are stored on Jetfire's forearms and, like the FAST pack armored they are inspired by, are removable. The two underslung laser cannons can be used as a pair of laser rifles, or stuck together as a double barreled rifle. The FAST pack booster can be removed, or left on in robot mode. If you leave it on, you can fold the front ends of the boosters down at a 90 degree angle, giving Jetfire a pair of shoulder-mounted cannons. However, leaving the FAST pack on in robot mode makes Jetfire very back heavy. Jetfire's feet, which are simply the jet's exhaust ducts opened up, are very narrow and don't provide quite enough support with the FAST- pack boosters on.
Final Verdict This is a great figure. I'd say that Jetfire, Mirage and Optimus Prime are the top three figures in the small Classics lineup, with Jetfire squeaking in at the top spot. If you see one in the store, you won't be disappointed. Unfortunately, it's becoming hard to find, at least in my area. The one I bought is only the second one I've seen in the different big box stores in my area (3 Wal-Marts, 2 Super Targets, and 1 TRU).
Vintage SW Ben (Obi-Wan) Kenobi (Double Telescoping)
It can be yours for the low, low price of only $24,999.99.
I thought it was a misprint, but this store also has a vintage carded Darth Vader for $20,000.00 and a Luke Skywalker for $12,000.00. My dad used to buy me a new Star Wars figure every Friday when I was a kid. I think they cost $3.00. If I had only known that I could be a rich man by keeping them on the card in mint condition, I'd have never opened them.
Have we gone so far that people are willing to shell out this much money for a toy that's only 25 years old and is made up of about 50 cents worth of plastic?
Leader Class
Optimus Prime
Deluxe Class
Protoform Optimus Prime
Protoform Starscream
Jazz
Barricade
Bumblebee
Brawl
Scorponok
Wreckage
Voyager
Blackout
Ratchet
There are also images of the Movie's Real Gear and Legends figures, which are the $6.99 and $3.99 price point toys (respectively).
1)Star Wars AT-AT
This is one I got back when I was a kid. Been in the attic for the last 20 years. It's got the dings and scuffs probably every kid that ever had one put on theirs. All of the stickers were faded and cracked, and the adhesive from the stickers was somehow baked onto the vehicles plastic. The left front knee was warped and bent to the side about 5 degrees. The left rear flexor joint was loose. The electronics didn't work, the chin guns didn't move back and forth or light up. The whole thing was covered in a fine layer of dust.
Gameplan
I plan on disassembling the whole thing. I want to clean off all the old stickers/adhesive, figure out why the right rear leg is loose, and try to re-align the left front leg. Ideally, I'd like to also repair the electronics through new wiring and/or a new motor. My long term goal for this is to make a fairly accurate recreation of the AT-AT's cockpit as well.
2)Star Wars AT-ST
Suffered from the same problems as the AT-AT minus the electrical isses and warped, bent parts. Same rehab plans. Clean it up, make it look nice.
3)Transformers Decepticon Blitzwing
I purchased this in a loose/no accessories condition. The condition was described as "C-7" whatever that means. The joints are all nice and tight. There's a lot of paint wear, especially on the cockpit/nosecone and the yellow highlights of the figure's head. There is nothing structurally wrong with the figure except for some stress marks on the wing tips, and the die-cast vertical stablizers have some scuff marks.
Gameplan
I plan to disassemble this figure and clean it up. I'm going to lightly sand and buff the entire figure in hopes of cleaning up most of the minor and scratches. I'm going to repaint the gray of the nosecone and cockpit as well as the figure's head. It has no decals applied, and I'm am currently planning on getting a set from Reprolabels.com, although I probably won't apply all of them.
Directions to the museum can be found here. Admission is $8.00 for adults and $4.00 for children ages 5-17. Hours of operation are:
Tue. thru Sat. - 10a to 5p
Thur. - 10a to 8p
Sun. - 1p to 5p
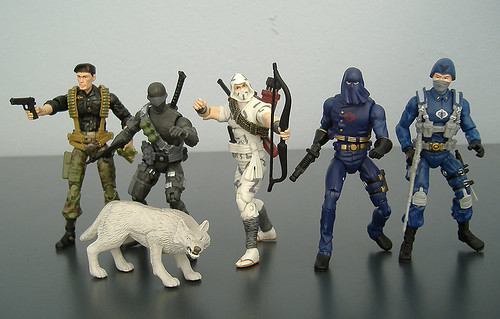
The first eleven figures which will include:
The Baroness 5-pack only
Cobra Trooper/Officer. Trooper - (5-pack version) Black facemask, black harness, black Dragunov sniper rifle, red Cobra logo; Officer - (Individual) Gray facemask, silver Dragunov, silver Cobra logo, harness with details, darker blue coloring. I'm not sure what the logic is here including the trooper in the 5-pack and the Officer as an individual figure. Seems like they'd figure that the Trooper is an "army builder" and you won't be able to do that without having to buy a 5-pack many times over. That's pretty stupid on Hasbro's part if they don't change it.
Cobra Commander 5-pack - CC's original uniform, with blue helmet and silver face shield. Individual pack - Darker blue uniform and the helmet/face shield is replaced with CC's traditional hood.
Destro 5-pack only
Storm Shadow 5-pack - solid white uniform with balaclava, cobra logo on left breast, black bandolier; Individual pack - white/gray camoflage uniform with balaclava/hood, no cobra logo, bandolier is replaced with rope. Both figures come with the same weapons...bow and arrows, 1 dagger, and a pair of ninjato
Flint - Individual pack only
Snake Eyes 5-pack - Figure is all black and has Snake's traditional goggles/facemask appearance. Comes with an Uzi, demolition satchel, dagger in holster (molded on to figure), and a utility belt/harness. Individual - Snake's "visor" appearance. Uzi, dagger/holster, katana, weapons bandolier, and pet wolf Timber
Scarlett 5-pack only
Roadblock 5-pack only, comes with Ma Deuce, tripod, and .50 cal ammo belt. Tripod looks like Roadblock will have to fire from a prone position. That's more realistic, but Roadblock should be standing up, or firing Ma Deuce from the hip.
Gung Ho 5-pack only
Duke 5-pack only.
Hasbro also has a poll up at the website asking which army builder figure you'd like. The choices are Cobra Viper, Cobra Trooper, Crimson Guard, Red Ninjas, Cobra B.A.T.s, or Eels. Vipers currently lead with Troopers in second. I'd like to see Hasbro wake up and move the Cobra Officer to the 5-pack and release the Trooper individually, that we we could get both Troopers and Vipers as army builders.
Not a bad collection. They certainly got most of the "important" figures in the first batch. I know the Joes are popular, but I'd like to see some Cobra army builders. I'd also like to see some Crimson Guards and maybe Tomax/Xamot (though not enough for them to occupy two of the remaining 14 slots. I'd definitely like to see a modern take on Firefly who is probably my all time favorite Joe character. I've never really been a Joe fan (the group, not the toy line) and they got my favorite good guys, Snake Eyes, Gung Ho, and Roadblock. However, I hope they release Barbeque, that was my brother's favorite Joe as a kid. I know this may be asking for a bit much, but here's hoping the release the Rattler/Wild Weasel and Dragonfly/Wild Bill vehicle sets, too.
What I like most about this, is that this means that a new wave of figures is coming to my area. There are a lot of clone trooper figures in the set, as well as two great clone trooper "Battle Packs." I'm a sucker for Stormtrooper figures, and this has me excited. In the newest wave of figures Clone Troopers are coming out with the following markings:
#57 442nd Seize Battalion
#59 5th Fleet Security
#60 Clone Trooper Sergeant (Attack of the Clones
#69 Combat Engineer
There's also two Battle Packs:
Jedi Temple Assault, comes with Darth Vader (Anakin), three 501st Legion troopers (which were, unfortunately not based on the super-articulated trooper figure, and a Clone Pilot.
Betrayal on Felucia, comes with Aayla Secura, Commander Bly, and three 327th Star Corps troopers (which, to my knowledge, have never been available as single figures.
Don't know how long these items have been out in the rest of the world, but they're here in Baton Rouge now.
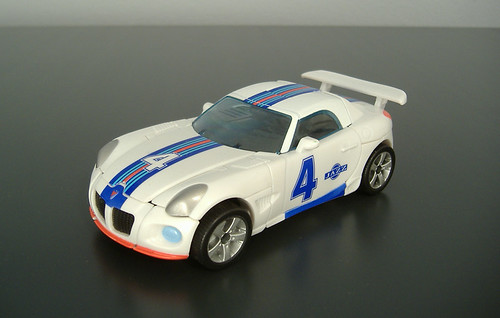
I wasn’t going to get this one. Like Grimlock and Astrotrain, I only sort of liked this figure but I not enough to warrant a purchase. However, I was feeling low and needed a fix and decided to pick it up.
Vehicle Mode
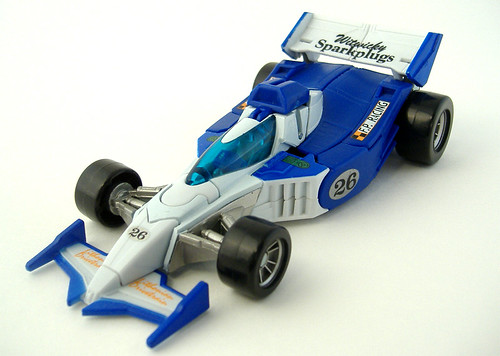
Mirage takes the form of an F1- or Indy Car- style car like his G1 counterpart. Classics Mirage also brings to mind Energon Prowl with an enclosed rather than open cockpit. However, Mirage’s vehicle mode is much sleeker than Energon Prowl’s. The vehicle mode is extremely well done. Mirage has his traditional number 26 and even uses the same font as his G1 figure. The homage doesn't stop there. Witwikcy Sparkplugs are seen as a sponsor on Mirage’s rear spoiler, and Lithonian Drivetrain seen on the front spoiler. In all, this vehicle mode is VERY well done, which is commonplace for this line of figures.
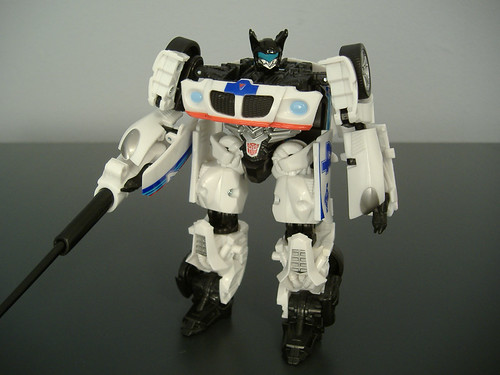
Robot Mode
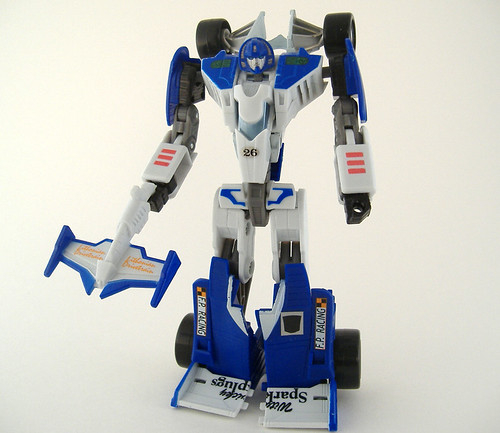
Looking at the intial pictures of this figure, I wasn’t really crazy about it. It looked like a stickfigure to me, much too skinny. However, I’d heard that it had excellent poseability, and I always liked Mirage’s character (the reluctant hero always appealed to me for some reason). Again, I was on the aforementioned "low" (see this plastic stuff IS addictive), and I’ve reached the point in my life where I don’t sweat a 10 dollar purchase-on-a-whim. Let me say that pictures of this figure do NOT do it justice. It is an excellent figure. I’d say that aside from Optimus Prime, it is arguably most well-done Classics figure in the line. It is certainly the most poseable. The elbow actually has two different joints so you can pose the arms anywhere from fully extended to bent 180 degrees (arm bent all the way so that you can touch your shoulder with your hands.) The legs are nearly as poseable, and the waist is capable of being rotated 360 degrees so poses are nearly limitless. The ONE flaw I can find is in the head, and this is not the designers fault so much as it is the design of the head itself.
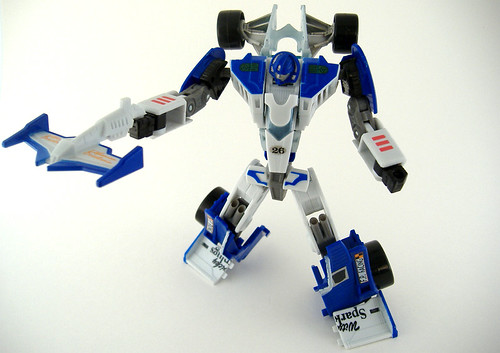
The designers retained G1 Mirage’s "helmet" design (the helmet flares from top to bottom where it is at its widest). The result is that the head cannot be turned side to side with also being tilted forward. Minor, MINOR complaint. I've even come to accept the fact that Hasbro is not including a visible faction symbol on this line (even though a big red Autobot symbol on this figure would have been awesome.)
Final Verdict
This is probably the best basic price point figure ($9.99) that I’ve seen in the Classics line so far (I only lack Grimlock). If you have ignored this line up to now or if you have been on the fence about Mirage, give him a try. This is a MUST HAVE for just about every Transformers fan.
UPDATE: Just showing off the Geewunny stickers I got from Reprolabels.

Revoltech, in case you don't know, is a toy line produced by Japanese toy manufacturer Kaiyodo, well known for their action figures. The Revoltech line, mostly robots, features ratcheting and other types of joints that allow the figures to be very poseable. So far, the line features mecha and characters from Evangelion, Transformers, Patlabor, Devil May Cry and Getter Robo, among others.
Look for a review of the Revoltech Ingram 1 from Patlabor and Evangelion Unit 01 in the coming weeks (soon as I get batteries for my digital camera.)
I got this for my birthday, so I don’t know where it was purchased. I know that I’ve seen this toy on sale at both Wal-Mart and Target recently, so you should be able to get it at a decent price.
To be honest, this line of figures has never really appealed to me. Counting this one, I’ve got three of the figures and I’ve gotten all of them as gifts. I also have the TIE Advanced/Darth Vader and the Jedi Starfighter/Obi Wan Kenobi figures. I don’t think I would have ever gone and bought these for myself. That being said, I AM a collector of all things Millennium Falcon (my wife would ask, “What AREN’T you a collector of?”), with several different versions of the ship. After getting this one out of the box, it will make a welcome addition to the collection.
Robot Mode
The Falcon is comprised to two figures, Han and Chewie. What’s nice here is that, when transformed into vehicle mode, none of the characteristics from robot mode show through. However, in robot mode, each figure doesn’t just look like a chunk of the Falcon with a head stuck on top. Each bot features some characteristics the actual character they represent exhibited.
The Han figure (we’ll call them mechs) tries to convey the image of Han from Episode V. The lower legs and feet have some dark gray highlights reminiscent of his black boots. Han's overall scheme is designed to evoke the uniform he wears through much of the first part of The Empire Strikes Back. The thighs are painted brown, to represent his pants, and even feature yellow “Corellian bloodstripes” on the sides of the legs. The shoulders and lower arms have some dark blue, as well, that hearken back to his dark blue jacket. The head isn’t a BAD representation, per se, it kind of captures Han’s furrowed brow and poofy 70’s haircut. When you consider that these are only supposed to be mechs and not the actual, living character, it works. There's even a neat little headset molded on the the figure's head. The figure itself, however, just sort of fails. Because of the transformation, part of the Falcon’s hull forms a kind of pair of wings, and the “torso” is very big and bulky. That, coupled with the figure’s tiny feet, makes the thing very unstable and top-heavy. The arms are another shortcoming. Because of the way the toy is designed, the shoulder armor doesn’t allow the arms to be positioned horizontally. You can’t take Han’s arm and raise it up so that it looks like he’s firing a blaster, you can only pose him to make it look likes he’s firing from the hip or just holding his blaster kind of nonchalantly. The upper quad cannon is Han’s blaster. There is also a hole on the “wings” where you can insert the radar dish, which must be removed when transforming into robot mode. Compared to the other figures in this line, the Han figure is just kind of…average, and not really fun.

The Chewie mech, however, is a completely different story. There are brown “fur” highlights from his head to his feet. These little highlights are completely hidden in vehicle mode. The feet even have little clawed toes. Do wookies even have clawed toes (or any toes, for that matter)? I don’t know, but why the heck wouldn’t they? The legs start out narrow near the hips and gradually widen to the ankles, and the feet are those big, clunky, shuffling feet of a wookie. The torso is, again, narrow at the hips and widen at the shoulders giving the mech a powerful appearance. The upper arms are molded completely in brown, and are textured to give the appearance of fur and there are brown “fur” highlights on the forearms as well. The lower “quad” cannon is actually just a double barreled cannon that is removed to become Chewie’s bowcaster. The Falcon’s cockpit is removed and can be placed on a hole on either of Chewie’s shoulders, sort of like the battery rocket launcher on the G1 Soundwave figure. That brings us to the figure’s head, and this is the feature that really makes this a great figure. The head evokes a fierce wookie warrior, baring his fangs. The head appears to share the brown fur motif found throughout the rest of the figure. However, if you look a little closer you see that the “fur” is not fur at all, but actually a series of lines and cables. Up close the head is completely mechanical and robotic looking (or at least a mechanical facsimile of an organic head), but seen from afar the figure simply looks like a wookie dressed in a suit of armor. Chewie’s mech figure more than makes up for the shortcomings of his human half.
Vehicle Mode
It works, and it doesn’t. Let me explain. I’m not going to complain that the vehicle is out of scale. I understand that the toy’s designers basically had to make a flying saucer transform into to relatively convincing humanoids. So sure, the Falcon may be too thick for it’s length, or too long for it’s width or whatever. It’s still in the shape of the Millennium Falcon, and it’s still got all the little bits and pieces and hunks and chunks in the right places. No one is going to look at this and confuse it for the ship from The Day the Earth Stood Still, so in that sense the vehicle works. Each half also features a battery powered light and sound feature operated by a button. The front section lights up (actually in the same exact place that the Falcon for the 3 3/4 in. action figures lights up). By pressing the button and letting go, you can hear someone doing a passable Harrison Ford impression giving some classic Han catchphrases like “I’ve got a bad feeling about this.” By pressing the button and holding it down, you hear the sound of the Falcon’s quad cannons firing. The back section lights up where the Falcon’s engine exhaust is located. By holding down the button you hear the sound of the Falcon’s engine roar and the light come on. By pressing the button and letting it go, you can hear such classic Chewie catchphrases as “Rwoooaaarhhh” and “RwoooAAARRRHHH.”
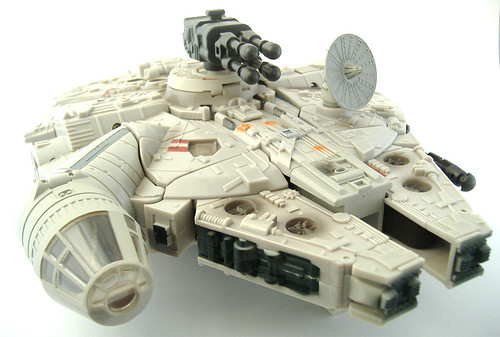
My problem is with the accessories. The upper quad-cannon, the cockpit, and the radar dish are all way too large. These are actually removed during transformation, so it’s not like they are hiding Han’s head or Chewie’s foot inside. The result is that the abnormally swollen cockpit, which could have maybe passed for a shoulder-mounted cannon, ends up looking like Chewie has an abnormally swollen cockpit on his shoulder. The freakishly large upper quad cannon becomes Han’s freakishly large blaster pistol. I’ve always questioned the placement of the radar antenna on the Falcon because the gunner in the upper quad could have accidentally shot the antenna. Well, on this toy the gunner doesn’t have to worry about SHOOTING the dish so much as he has to worry about knocking the antenna off with the barrel of the cannon. Then there’s the placement of a spring-loaded missile launcher on the toy. Okay, so the Falcon had torpedo launchers, but in the films, these launchers were placed between the mandibles. The spring-loaded missile launcher is on the left side of the hull, and it sticks out about 3 inches, which makes the Falcon look like it’s flying around with a mutant pitot tube (Hey, there’s the name for my next band, The Mutant Pitot Tubes. I called it first!).
Final Verdict
In the end, what it looks like, at least to me, is that the toy designers did a fantastic job of designing the Falcon itself. Then they had to go and screw it up by making all the parts that stick out just too darn big. The Han mech is OKAY, no worse than any of the other figures I have, but Chewie’s mech alone COULD justify full price for this toy. If you find it on sale, I’d say pick it up.
I grew up in an area that did not have cable television. There were not enough houses per square mile for the local cable company to justify serving our area. We tried once and were told that all the houses within a certain radius would have to sign a service contract before they'd do it, so we were stuck with VHF and UHF. Because of this, my introduction to the Transformers was mainly through toy catalogs and seeing the figures on toy shelves. Sometimes I went home with friends who were lucky enough to have cable, so I'd make them let me watch Transformers and GI Joe, but other than that I was on my own. It was up to my imagination and what I could get from the bios on the back of the toy packages to develop the characters. Being an avowed airplane nut, the Seekers were the group I was most interested in and tried to learn the most about. Naturally, I’m in hog heaven since Hasbro has already released half of the six members of the group (I only count the original six), Starscream, Skywarp, and Ramjet.
Vehicle Mode
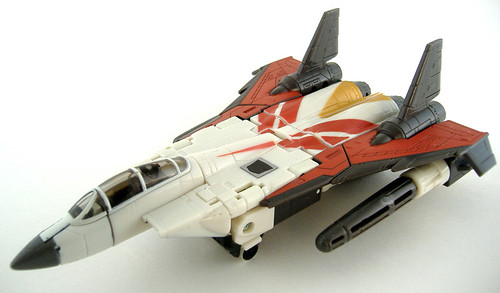
While Ramjet is based on the original Classics Starscream figure, it isn't a simple repaint. There are some fairly significant mold changes as well. The most notable changes in this mold are to the wings and the aircraft's nose cone. First, the Starscream/Skywarp figure's nose is made of three main "pieces" (I'm not counting the separate parts, like hinges, rubber tipped nose, canopy, etc.); a front half, back half, and the head (the face of which is hidden in this form). Ramjet's nose cone is greatly simplified, with only two "pieces", a front and back half. The front half is new to this figure and more rounded and about a half inch shorter. Where Starscream/Skywarp's vehicle is based on an F-15 Eagle, Ramjet's shortened nose looks more like it belongs on an F-14 Tomcat. Although the canopy is molded the same on each toy, it is proportionately larger on Ramjet (the F-14 is a two seater and has a longer canopy than the F-15, which is usually a single seater.) All three toys have a "roll bar" molded into the front of the canopy glass, characteristic of the F-14 but not the F-15. The canopy is molded in a clear dark gray plastic, which gives it a tinted appearance. The other major change is to the wings. Starscream/Skywarp's wings, again, are based on the real world F-15. Ramjet's vehicle mode instead is delta winged. The wings are dihedral (upswept) except for the wingtips (about the last 5mm), which are anhedral (down swept) and also forward swept. (SIDENOTE: Wings that are both anhedral and dihedral are sometimes referred to as polyhedral). Since the delta wing goes all the way to the tail of the aircraft, the traditional F-15 vertical and horizontal stabilizers are gone. Instead, what looks to be two huge rocket boosters are molded into the wings, and the vertical stabilizers are molded onto the top of these. The rocket boosters are a nice addition, since Ramjet's bio says that he prefers to ram his enemies rather than dogfight with them. The rockets would give Ramjet that extra little kick needed. Ramjet's wingspan is less than Starscream/Skywarp's and this in addition to his shorter nose makes him appear like a smaller, more maneuverable aircraft. Ramjet's missile launchers are the same as those found on the previous two molds, but the missiles themselves are different. Where Starscream/Skywarp's missiles are slender near the middle and thicker near each end, Ramjet's missiles are more shaped like a torpedo or the bow of a submarine; they are thick all the way through and taper to a dull point near the end.
Robot Mode
Transformation is the same here as the other two Seekers, except for the head. On Starscream/Skywarp, the nose is rotated 180 degrees, the front half is flipped back to reveal the head, and the head is rotated 180 degrees to reveal the face. On Ramjet, the whole assembly is rotated 180 degrees just like Starscream/Skywarp, then the front half is again rotated 180 degrees to reveal the robot's head. This is done so that Ramjet would have his traditional "conehead" appearance. The only downside to this is that the face is not hidden in vehicle mode. It is visible on the underside of the nose. The face is entirely new, it is more solemn-looking that Starscream/Skywarp's. Because of the smaller nose cone the face is slightly smaller than on the other two figures. Like the G1 toy, Ramjet's wings remain attached to his legs in robot mode. The two hinges for the wings found on Starscream/Skywarp are here, but they are really "vestigial." I can't find any real purpose for them other than maybe to keep that part from hindering poseability and were probably included so Hasbro wouldn't have to re-do the entire mold.
Final Verdict
Another great homage/reincarnation in the Classics line. Since this figure is an almost entirely new mold rather than just a straight repaint, its worth picking up if you already have Starscream or Skywarp. My only gripe is, once again, there is no Decepticon symbol on the figure other than the "mood" sticker included on all the Classics figures. Now I'm just waiting for Thundercracker, Dirge, and Thrust.
This is probably just a problem unique to my figure. When I opened the package one of the spring-loaded missile launchers was missing. The missile itself was there, but the launcher wasn't. It was unopened so I assume this was an error from when my particular Ramjet was packaged. I have had good experiences with Hasbro's customer service with replacement of defective or missing parts. I couldn't find this figure in any other surrounding stores, so I opted to go through Hasbro rather than try to find another figure to get the launcher and then return it as "missing a part." It's going on three weeks and I've yet to hear from Hasbro regarding this problem (it's usually less than a week).
I saw this at Target the other day, and luckily it was on sale for $17.99. Since this 2-pack consists of 2 repaints with almost no physical differences between the original figures, this review will focus mainly on the changes. Ultra Magnus is a repaint of the Classics Optimus Prime figure, and Skywarp is a repaint of Classics Starscream.
Ultra Magnus
Vehicle Mode
This is a nice repaint. Instead of the figure being almost entirely white like the original G1 figure, this new incarnation features some blue along with some silver highlights to help the figure not appear so bland. In vehicle mode, some blue with sliver striping is seen on the sides of the vehicle's cab, and the rear of the vehicle is entirely blue. Where the rims of Optimus Prime's wheels were painted silver, Ultra Magnus' wheels are gold. This color works well because it keeps Ultra-Magnus from just being tri-toned. The thing I like on Magnus' vehicle mode is that the front bumper and grill assembly are painted silver. These parts are just molded in gray plastic on Prime, and the painted parts look much better.
Robot Mode Again, no physical differences. In 'bot mode, Ultra Magnus' legs are entirely blue below the knees and the forearms show some of the blue and silver striping from vehicle mode. This keeps the robot mode from looking too bland. Unlike Optimus Prime, however, Ultra Magnus has a painted Autobot symbol on each shoulder, and is the only mold change from the Prime figure that I can see. I like this addition. My one gripe is that Magnus' face plate is actually painted silver, most photos from Hasbro and even the photos on the back of the box have his mouth plate as blue, which is traditional for Ultra Magnus. I guess this was changed in production, I wish it had remained. In order to differentiate Magnus’ face from Prime's, the mouth plate is painted slightly different. On Prime, the entire plate is painted silver. On both figures there are two small indentations roughly where his lower jaws would be. On Magnus, these are unpainted and remain white. It seems that the light-piping feature of Magnus' eyes work a little better than the one found on Prime, and I believe this is because Magnus’ head is molded in white rather than blue plastic. The white plastic reflects light rather than absorbs it, and the effect makes Magnus eyes seem like they really are lit by an internal source. Unlike Prime's main weapon, Ultra Magnus' is molded completely in black plastic. This coupled with his almost completely white paint scheme sort of reminds me of a Stormtrooper, and gives Ultra Magnus that "Warrior" image.
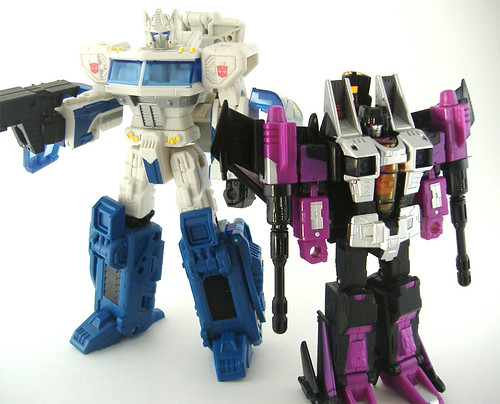
Skywarp
Vehicle Mode
As far as I can tell, Skywarp features no mold changes from Starscream. Skywarp's current form features a little more purple and silver than his G1 figure. The black plastic is glossy and shiny, and makes his vehicle mode really stand out. The canopy is molded in an almost orange color (as opposed to Starscream's more yellow canopy). This was probably necessary so that the color would stand out, I don't think the yellow used on Starscream would hold up against the black. My only real gripe here is the actual color purple used. It's more of a pinkish-purple than the purple used on the G1 figure. I think that this figure with the original purple would have looked awesome. Some of the parts are molded in purple plastic, and some of the parts are molded in black with the purple painted over. Here the paint layer isn't quite thick enough. The black plastic sort of shows through and makes the purple two different tones when seen up close. Other than that, though, the vehicle looks great, especially when parked next to Starscream.
Robot Mode
This mode features maybe a tiny bit more purple than the original G1 figure, but stays very true to that toy. The chest is mostly silver, with a nice paint job. I think robot mode looks great on this toy. The head is molded in black, so the face is painted silver. This gives Skywarp's head a better appearance that Starscream's, which is molded in metallic gray plastic with the "helmet" painted black. On Starscream's head, the inner part of the helmet near his cheeks are left unpainted (which is probably because of the manufacturing process), and Skywarp's face stands out a little better. My only gripe, and this is also carried forward from my Starscream review, is the lack of Decepticon symbols on Skywarp's wings. If there ever was a figure that just SCREAMS for a big purple Decepticon symbol, this is it. It may seem minor to some, but I feel this holds the figure back from being truly outstanding.
Final Verdict
Minor complaints about the figures aside, I recommend this two-pack. There's just too much going for it. First, both figures are well done and deserve to be in your collection as an homage to or reinterpretations of these classic G1 characters. Second, the price makes this pack a real bargain, even if you aren't lucky enough to find it on sale like I did. The original Classics Prime is $19.99 by itself and Starscream is $9.99, so you're getting almost $30 in Transformers for the price of one. If you already have the first two figures, you still need these. If you haven't yet gotten them, or are unable to find them (maybe not a problem for Prime, but definitely for Starscream), then this 2-pack is a nice substitute.
I said a while ago that Soundwave was my favorite Decepticon. I retract that statement. Soundwave was one of my favorites, but my actual favorite of all time Transformer was Starscream. I was an airplane freak as a kid and Starscream was just about the coolest jet out there. He was sneaky, treacherous, backhanded, and back-stabbing, only in it for himself. His trickery and deception always failed and yet, he never gave up. For all of that, I was not one of the fortunate owners of this toy back in the 80's. When the G1 reissues came out I plunked down the full $34.99 for my Starscream reissue and that was the only time I ever felt no pangs of guilt for spending over 30 bucks for a Transformer. (Well, except for my Masterpiece Optimus, but I even then I got him on clearance for something like 45 bucks.) My son got this figure for me for Christmas, and it belongs in your collection, too.
Vehicle Mode
Starscream is in his classic F-15 Eagle form here. Complete with yellow canopy and dual spring-loaded missile launchers (or Null-ray weapons, if you prefer.) This figure, in my opinion, is the EPITOME of what Hasbro's Classics line should be. The original figure only brought up to the current standards of poseability. There's a tiny bit of robot kibble on the underside, and the vehicle mode is a bit chunky because of it, but if you look at the vehicle from a top-down or angled perspective you don't really notice. Also, the nose of the aircraft is a bit more F-14 Tomcat-ish. Other than that, an F-15 Eagle is reproduced with fairly good accuracy if you consider that in a few minutes it's going to be a robot. My ONLY gripe with this is that when parked Starscream does not have a nose gear, but rather two tiny wheels flip out from his chest to form the front landing gear. The rear landing gear wheels are molded into the parts that will become Starscream's feet, just like the original figure. This gives Starscream a slightly odd appearance when parked on the ramp. For an aircraft nut it's a bit offputting to see an F-15 parked without it's nose gear deployed.
Robot Mode
Here is where the toy really shines. I love the way the transformation is handled. First, you pull rear fuselage down to deploy the legs and fold the portions on the underside of each engine to form the feet. Where the original G1 figure the legs were unposeable, the new Starscream has articulation at the hips and knees. The hip joints on my figure are looser than I'd like, but this may just be unique to my figure. The feet hold true to original's "hollowed out on top" look. There's no clunky "pull it out and insert a different peg" transformation of the vertical and horizontal stabilizers. The Vertical stabilizers are rotated forward 90 degrees, and the hinged horizontal stabilizers are folded up parallel with the vertical stabilizer. The upper body's transformation is what I really like. On the original G1 figure, you had to fold the nose cone down and through the figure's abdomen, this would force to nub-like arms out and you had separate pieces for the forearms and hands (well fists) that you had to keep up with when not in robot mode. On the new version, the forward fuselage opens up like a clamshell, the two arms swivel out to the side, and the hands are folded up in the forearm. Once the arms are out of the way, the nose of the aircraft is rotated 180 degrees, the cockpit is on a hinge that allows it to be tucked down in the "clamshell," which is then closed. The nose cone is simply flipped back to reveal Starscream's head. You rotate Starscreams head 180 degrees to see his face (his face is hidden in robot mode, unlike the original figure.) The two front landing gear wheels (if deployed) are folded back into Starscream's chest and become his characteristic "pectoral turbines." The only bit of kibble located on the figure in robot mode are the wings and the front portion on the nose cone, which hangs off the back of Starscream's head. The wings are iconic of the G1 Seekers and it would have been a travesty to do anything else with them. The original G1 figure also had the nosecone hanging off the back of the head, so I can't really complain here.
My one gripe about the figure, and it's something I carry forward from my review of the Classics Optimus Prime, there's no Decepticon symbol on the toy at all. There's the mood sticker on one wing, but again, this only seems like an afterthought. (Now that I think about it, NONE of the Classics figures I own have a painted on Autobot or Decepticon symbol, they all come with a simple mood sticker. What gives?) A Decepticon symbol on each wing, like the original figure, would have made this the best looking Starscream toy ever. As it is, I hold this one in about the same regard as my Armada Starscream. Sure it's no where near as poseable, but he had raised and painted Decepticon symbols on his wings (which, with a little gray paint in the recesses, looks AWESOME) and came with that classic Starscream smirk.
Final Verdict
Once again, minor complaints about the lack of Decepticon symbols aside, this is an excellent figure. Hasbro is two for two in its Classics line. Run, don't walk, to your local Mega-Mart and pick this figure up.
I got this with some Christmas money. I actually paid full price for this one, which I don't usually do for Transformers over the $9.99 price point if I can help it. I'm glad I did, because this is an excellent figure with only one REAL complaint I can think of.
Vehicle Mode

Optimus is in his classic vehicle form, a tractor (as in tractor-trailer, not as in farm) with a mainly red and blue paint scheme. However, instead of his usually, boxy, flat-nosed, cab-over-engine appearance, Optimus has been given an appearance that is a tad more streamlined. Instead of his cab being shaped like a box, the windshield and front bumper are rounded off at the corners, and he also comes with a nice big wind vane over the cab. This wind vane can be removed, but it covers up the area where Prime's head is stored, so it helps with his appearance. There are some silver details painted on the sides of the cab, wind vane, and the rims of the wheels. The front bumper is molded in plastic gray, and I wish this had been painted in silver to match the rest of the truck, but this is a minor complaint. There is a separate piece that forms the smokestacks. In all, I think this is a very good "modern" interpretation of the classic Prime we children of the 80's grew up with.
Robot Mode
Optimus shares a standard transformation scheme with most of his predecessor. The rear portion of the tractor folds down to become the legs, the arms unfold from the cab, and the head flips out of the top of the cab. The legs must be rotated 180 degrees once they are folded down in order for his feet to be facing the correct direction. The neat thing here is that rather than have the rotation occur at the hips, the rotation actually occurs on a joint just below the chest section. The result is that Prime's big blocky front bumper and tires are also rotated behind his body, leaving a nice, slender waist and keeping Optimus from looking like a tractor cab with legs and arms (Energon Optimus, I'm looking at you.) The wind vane is angled back and is either left there as a sort of back armor, or can be removed and transformed into a long-range looking blaster. The head is simply flipped up out of the top of the cab. My figure had the face facing up, but I turn the head around 180 degrees and have the face looking in, that way I can remove the wind vane and still have Prime's face hidden in vehicle mode. The smokestacks are removed and folded together, this forms Prime's main weapon, a double barreled blaster. The blaster is molded in black plastic, but the main barrels are painted in silver. The only real complaint I have here is what happens with the forearms. The side window portion of the cab is folded out and over the forearms during transformation and they just sort of stick out on the sides. This leaves Optimus with the only bit of "kibble" (parts of from vehicle mode that just sort of hang off the side, but serve no function) on an otherwise sleek looking robot mode. Again, a minor complaint. Prime's eyes are clear blue plastic, and are light-piped. Prime's "helmet," as usual is molded in blue, so the clear blue portion on the back of the head that pipes light to the eyes does not stand out. However, because the blue is such a dark color, the light-piping effect is minimal in normal ambient light. You have to be looking head on to get the effect at all. Again, minor complaint as the eyes could have just been opaque blue plastic.
My one REAL complaint with this figure? There's no Autobot symbol! Sure, there's a heat sensitive "mood" sticker that, if you place your finger on it and wait...oh...about 5 minutes, the Autobot symbol shows up (these mood stickers don't work as well as the original G1 stickers.) But even this is stuck on the side of the cab and seems like an afterthought at best. Sure, I understand the whole "Robot in Disguise" motif, and I don't want my 'bots going around in vehicle mode screaming "I'm an Autobot/Decepticon!" But because of Prime's transformation scheme, that red Autobot symbol would have been perfect if they had put it in the usual place, his shoulder, as the symbol would be hidden in vehicle mode. Hasbro, this is Optimus Prime we're talking about. Leader of the Autobots. He needs to wear that Autobot symbol proudly.
Final Verdict
Even looking at that minor gripe, I can't find any reason not to tell you to run out and buy this figure, now. Except for the Masterpiece Optimus, it is probably the BEST Optimus Prime figure ever released domestically. With all the other lines OP's (Armada, Energon, Cybertron) being around the $40 price point, it certainly is the best bang for your buck.
Most Gundam models, especially the HGUC (High Grade Universal Century) and MG (Master Grade) kits, indeed most of the modern kits released by Bandai (which makes model kits for most mecha anime properties, it seems) look good right out of the box with most parts molded in the correct colors. I do plan, one day, (when I have more time and less children in the house) to fix up a painting rig and paint the kits, so I am in no way bashing those who show their models a bit more care and love than I do.
The FIRST thing to know is that you DON'T HAVE TO BUY YOUR SUPPLIES AT A HOBBY STORE! The stuff there is typically too expensive and too cheaply made. Most of the stuff you need you can find at the cosmetics department of your local Wal-Mart or mega-pharmacy. (For you men, don't fret about the thought of you hanging out in finger nail polish section. I do it all the time.)
Things you will need: 1) A Gundam model kit (obviously). The best place to buy these is HobbyLink Japan. Largest selection, lowest prices. The only drawback, these are shipped from Japan, so it will take a few weeks. The wait's worth it.
2) Something to cut the parts off the parts tree or sprue. Please avoid those specialty clippers you see down at the hobby shop. A pair of fingernail clippers works just fine. You don't have to get a fancy pair with a nail file and a little blade that digs gunk out from under your fingernails, just a plain old 99 cent pair will do. Plus, you can also use them to trim your fingernails. A Multi-tasker!
3) A GOOD hobby knife. I recommend a #2 knife made by X-Acto. The handle on the #1 knife is a bit small, so if you have smaller hands, you may like it. I spent $20 on a "Hobby Knife Set" at a hobby store, which was essentially a cheap knock-off of X-Acto's Basic Knife Set (which, as it turns out, sells for the same price at Wal-Mart.) Within three months, the magnet that held the extra blades in place came loose. Even worse, the blades began to rust and eventually became completely unusable. X-Acto's Basic Knife Set is pretty nice, but to be honest I've never used half the blades in my set. The blade that comes with the single X-Acto is perfect, and you can buy replacement blades in packs of 5 for about 99 cents. Please do NOT use a cheap imitation here. Cheaper knives have blades that dull very quickly. As any cook or chef can tell you, a dull knife is much more dangerous than a sharp one. You'll use more force to make a cut, and when it slips...GOODBYE FINGERTIP! (I've sliced my thumbs and fingers open enough times to know. Even a dull hobby knife cuts pretty deep.
4) Model Cement. I recommend the kind from Testor's that comes in a black triangular "tube" with a narrow plastic tip. (They used to make it with a metal tip that was MUCH better, but I guess it also made a good prison shank because they changed it to a tapered plastic tip.) There's a basic difference between model GLUE and model CEMENT. Model glue dries between two parts, and as the moisture from the glue dries, what is left behind is what forms the bond between the two parts. Model cement, on the other hand, actually melts a thin layer the polystyrene plastic and as this dries the plastic simply re-hardens. This basically "welds" the two halves together. I find this bond to be much stronger than the bond from model glue. Also, since the glue leave behind a trace layer between two halves, they will be a tiny bit wider than if you use cement. Since cement does not have this tiny layer, you get a better fit between parts.
5) Something to file and smooth the plastic parts. Sure, you can go down and buy that fancy modeling sandpaper most hobby shops sell. But I just use a simple finger nail file. I USED to use a two-sided fingernail file made by Fing'rs. It had one side that was half pink and half white that was two different "grits," one coarse and one fine. The other side was a gray "buffer." I can't find this one any more, so I found a brand that is essentially the same thing, only on three different finger nail files. A finger nail file is much easier to control than sandpaper, and you can fit it into tighter spots.
Optional Tools 6) Clothes pins (the kind with springs, not those old-timey ones.) 7) Q-tips 8) Cosmetic sponges (Ask your mom, sister, wife, or girlfriend.) I like the kind that is triangular or wedge-shaped. 9) Paint brush. Camel or other natural hair. Don't buy those el-cheapo brushes in Wal-Mart. Those are only good for...well, I don't really know what they're good for. Natural hair bristles are very thin, and make a hand-paint job look good. You can find a good brush for under 2 bucks. I have two brushes that I use, one that is a camel hair 1/4 inch (width) brush which cost $1.20, and a camel hair Detail brush (which has maybe 5 bristles, and tapers to a point). With these two brushes, you can paint anything from large areas to tiny little details like eyes. 10) A few sheets of Foam Rubber. (You can usually find this in a teacher supply store. Sometimes with letters and numbers molded into the sheets. These are only a couple of millimeters thick.) 11) Future Floor Wax 12) Cosmetics Brush (the kind used to apply blush, usually.)
There, that's basically all you'll need. Other than the model, that's what, maybe $10 bucks worth of supplies? Most of these you probably have laying around the house, anyway. Go spend $10 down at your local hobby store and see what that gets you.
Assembly This is the basic assembly pattern, and you should use this on each final "piece" (foot, leg, arm, etc.), and not the entire kit as a whole.
1) Read the instructions! Even though most Gundam kits are in Japanese, they have nice pictures that are clear and easy to understand. Even though most Gundam kits (especially the 1/144 scale) follow a similar construction method, there may be a twist or turn that, if you miss, can be tough to fix once the parts are glued...err, cemented together. Also, don't go cutting all the parts off the sprue at once. Keep the parts on there until you need them. If you need to paint something, its easier to hold the sprue than it is to hold that tiny little part (Of course, if you want to paint, say, a whole leg, you're going to have to put the parts together before you paint.)
1a) Wash your parts trees in mild soapy water. Rinse, shake off the excess water and allow to air dry. (I'll explain why below).
2) Using your clippers or other cutting device, cut the part off the sprue (do NOT use your hobby knife for this, this will dull the blade quickly.) The trick here is not to cut the part too close. What I mean is, don't cut it right where the sprue ends and the part stops. You'll leave a divot, and this is not repairable without using putty. You want to avoid having to go get some. What you want to do is leave a little part of the sprue on the part, just a couple of millimeters, but enough so that you are not cutting the actual piece that is left. When finished, you should have the part you need, and it should have little "tabs" everywhere the part was attached to the sprue.
3) Using your SHARP hobby knife, trim those tabs off. The technique to use here is to place the edge of the knife's blade right at the point where that tab joins the part. Then, keeping the blade parallel to the part's surface (if it's flat), or nearly so (If it's rounded), apply gentle pressure and "shave" the tab off. You may have to do this a couple of time to get the part smooth. Practice this a little. Too little pressure and it will take you several attempts to get the tab cut off. Too much pressure and you may gouge the part's plastic. THIS IS NOT REPAIRABLE without extensive work.
3a) Put any polycaps in place if applicable. Polycaps are the small, rubbery plastic pieces (usually gray in color) that are used to form elbow, knee, and ankle joints. Some of the older 1/144 kits also used this for the kit's hands. Gundam kits are usually poseable, and a polystyrene on polystyrene joint would wear out very quickly. Polycaps are very durable, as well as soft, so the joints are very stable and can hold a position. DO NOT SKIP THIS STEP! I can't tell you how many times I've realized I forgot this step right after cementing the parts together. The resulting string of expletives can usually make a sailor blush. Check and Double-Check that you've done this before moving on!
4) Cement the pieces together. Here's where the specific Testor's cement I recommended comes in handy. It has a very slender applicator tip. What you have to do is cut the very end off the tip. Cut it very close to the end so that the hole the cement comes out of is as small as possible. Model cement is a clear liquid that is about as viscous as milk, so you have to be very careful with it. You don't want it running out all over the place. (You especially don't want it running out all over the plastic piece. Remember, this stuff MELTS plastic.) Usually, the parts of a Gundam model, if not a single piece, are molded from two separate "halves," either a left and right half or a front and back half. What you're going to do is run a VERY THIN layer of cement around an entire half (where this half will be touching the other half. The surface you are applying the cement to should be perpendicular to the outside surface you will actually see.) You may even want to very gently sand the two halves to remove any debris and level off and abrade the surface to give the cement something to hold on to.
NOTE: The current trend in some model kits is to have the joint actually contained within a "panel line" on the kit. (A panel line is a recessed line on the surface of a model that simulates a panel, armor plate, or two separate pieces of metal. Take a look here. All those black lines on the surface of the model are panel lines. If the gap between the two halves will be in a panel line, don't put cement here. You'll see why below.Once you have applied cement to one half, CAREFULLY join the two halves together. Take care not to get any cement on your fingers. You won't notice until you put your finger tip on another piece of plastic and it sticks to your finger. It will etch your fingerprint into the model's surface. Once the halves are joined, apply gentle pressure to squeeze the two halves together, and count to 20 (one-mississippi, two-mississippi). If you did this properly, the cement (actually melted plastic) should be forced up out of the seam between the two halves. If you didn't apply too much, it will just form a little ridge and not run out everywhere. If you didn't apply enough, none will run out. This isn't bad, the two halves will still join together as long as there is SOME cement, it's just not ideal. Set the piece out of the way and let the cement cure. Overnight is good, 24 hours is better.
NOTE:If you have some clothespins and foam rubber sheets, here's where they come in handy. You can make a make-shift vice by cutting a few strips off your sheet of foam rubber, and gluing these (Elmer's works fine) to the inside of the gripping end of the clothes pin. You can use this device on smaller parts to maintain pressure on the two halves until the cement cures. The little notch in the clothes pin is perfect for some of the smaller pieces. Just be careful you don't get cement on anything, or you'll have a mess on your hands.5) Once the pieces have cured, you have an actual PART. A leg, a forearm, shoulder armor, a head, etc. But you also have that ugly little ridge of cured plastic sticking up between what used to be the two halves (remember, you've welded the plastic together, now its truly one piece of plastic.) You've got to clean that up to make it presentable. No problem! You're simply going to use the same technique you used in shaving those tabs off the parts you have cut off the sprue. Place the blade parallel to the part's surface, and hold it about a 30 degree angle. Use the same motion you used to "shave" that tab off, only shave off the ridge of plastic that came up out of what used to be the seam between the two halves. When you get done, you should have the surface should be flush and fairly smooth. The plastic may be a little discolored, but you can always paint over it. It always looks better, IMO, than a big ugly seam-line.
6) Sand the parts. Use the coarse grit fingernail file, then the fine grit, and finally the buffer. If you do this over the former seam-line, the piece will look uniform and whole, and shiny to boot! Sanding also helps you clean up mold lines.
NOTE: Plastic models are sometimes called injection kits. This name comes from the process used to create the individual parts trees or sprues. Each sprue has an individual mold. A mold is created from two dies, a top and bottom half. These dies are pressed together to form the mold and molten polystyrene plastic is INJECTED into the mold. After the plastic hardens, the two dies are removed and what's left between them is the sprue. A tiny bit of lubricant is sprayed into the mold before the plastic is injected so that the finished product will release from the mold, this is why you should wash your kit before assembly. Unfortunately, the dies are not always aligned correctly (sometimes off by a nanometer), and this will leave a mold line. The dies may also not be completely pressed together, (they wear out over time) and a small amount of plastic will run between the dies, leaving behind a small imperfection called "flash." If you ever played with green army men, you've probably seen flash and mold lines before. The flash was usually a small circle on the back of the helmet, from the point where the plastic was injected into the mold used on the figure. Flash is VERY uncommon on more modern kits, at least those made by Bandai.There you're mostly done, and could stop there, but your kit may not look quite right.
7) Painting. Paint any parts that are not molded in the correct color (you don't have to if you don't mind color inaccuracy.) I recommend Acrylic paints. These are water based and are easier to clean up than enamels. You just have to wash your brush in water. Enamel paints are oil based and require thinner to clean your brush. But don't IGNORE enamel paints! Enamels are usually thicker and are great for painting smaller details. I can't stand the way red polystyrene looks (too...uhh...plastic-y), so I always paint anything that's molded in red. Paint anything that you are given a sticker for (don't put the sticker on, though!) These are usually eyes things like eyes, scopes on weapons, cameras and sensors. Also, you should paint the inside of the models vernier (rocket) nozzles either black, red or yellow. (look to the pictures included with the instructions for guidance.)
7a) Once you've finished painting, you may want to seal the paint. Model paint is very delicate and can easily be scraped or scratched off. Here's where the Future Floor Wax comes in. Brush a very thin layer of Future over any part you have painted, and the paint job becomes nearly indestructible. Okay, not really, but it will be more durable than not sealing the paint. However, keep in mind that Future will leave your paint with a gloss or semi-gloss finish, so I wouldn't do this on anything you want to have a matte finish. There are paint sealers specifically made for plastic models, including matte finishers, but I never fool with them. Future is also acrylic, so cleaning up your brush is a snap.
8) Put your finished model kit on a shelf and admire it from time to time.
9) Your kit will get dusty from time to time (unless you keep your house spic and span.) Whip out that make-up brush and GENTLY use it to brush away the accumulated dust.


![HGUC Gundam RX-79[G]](http://www.hlj.com/hlj_gallery2/v/shs2007/gundam/DSC_0196.jpg.html)